
2012 Yamaha R6 Full Engine Rebuild: Part 1, Introduction
I have successfully completed a full engine rebuild of a 2012 Yamaha R6 motor. The reason for this rebuild was low compression, high mileage, and the fact that this was a used machine from a prior owner that performed some questionable “modifications” and obviously low-sided the motorcycle a few times, likely on a race track. I am an “enthusiast”, so why not just rebuild the engine and know exactly what I’m dealing with, right? As winter 2018 set in, I pulled the engine out of the motorcycle chassis, dragged it up the stairs to my apartment (I do not presently own a garage, if you do own a garage, this will be a much more pleasant experience), and dug in for some extended tinkering.
This is one article in a series, which will detail the rebuild as well as offer guidance to any aspiring mechanics:
- Part 1, Introduction: Motivation, how to get started, and critical chemicals and tooling.
- Part 2, Disassembly: Some key parts of disassembly not covered well in the manual/other sources.
- Part 3, Inspection & Cleaning: Combustion chamber surfaces, valve and piston installation, valve clearance adjustment.
- Part 4, Reassembly: Some key parts of assembly not covered well in the manual/other sources. Starting it up and break-in period.
With this series of articles I aim to offer technical advice that is not well covered elsewhere, and concentrate it all in one resource. This series specifically focuses on the Yamaha R6, but will generally apply to any modern inline-4 supersport (600cc) or superbike (1000cc) motor (very similar construction between modern, fuel-injected, water-cooled aluminium racing engines).
1 Overview
At the end of my first year of motorcyling, I traded in a cruiser style motorcycle (it doesn’t really matter which one) for a 2012 Yamaha YZF-R6 supersport motorcycle. In hindsight, this was an excellent decision. It enabled me to get training in a race track environment and improved my throttle control, braking, body positioning, corner entry (everything) significantly. If you are looking to increase your motorcycle life experience for minimal cost, you should buy an R6. I can fully recommend the purchase of an R6, any year after 2010, but the newer (2017+) models are particularly incredible. I understand that you like taking your 1970 CB750 cafe racer build to the Starbucks, and that those middle-aged women you met at the local dive bar really like riding behind you on your Sportster 1200, I get it. You should get rid of those and just buy an R6 (I recommend it).
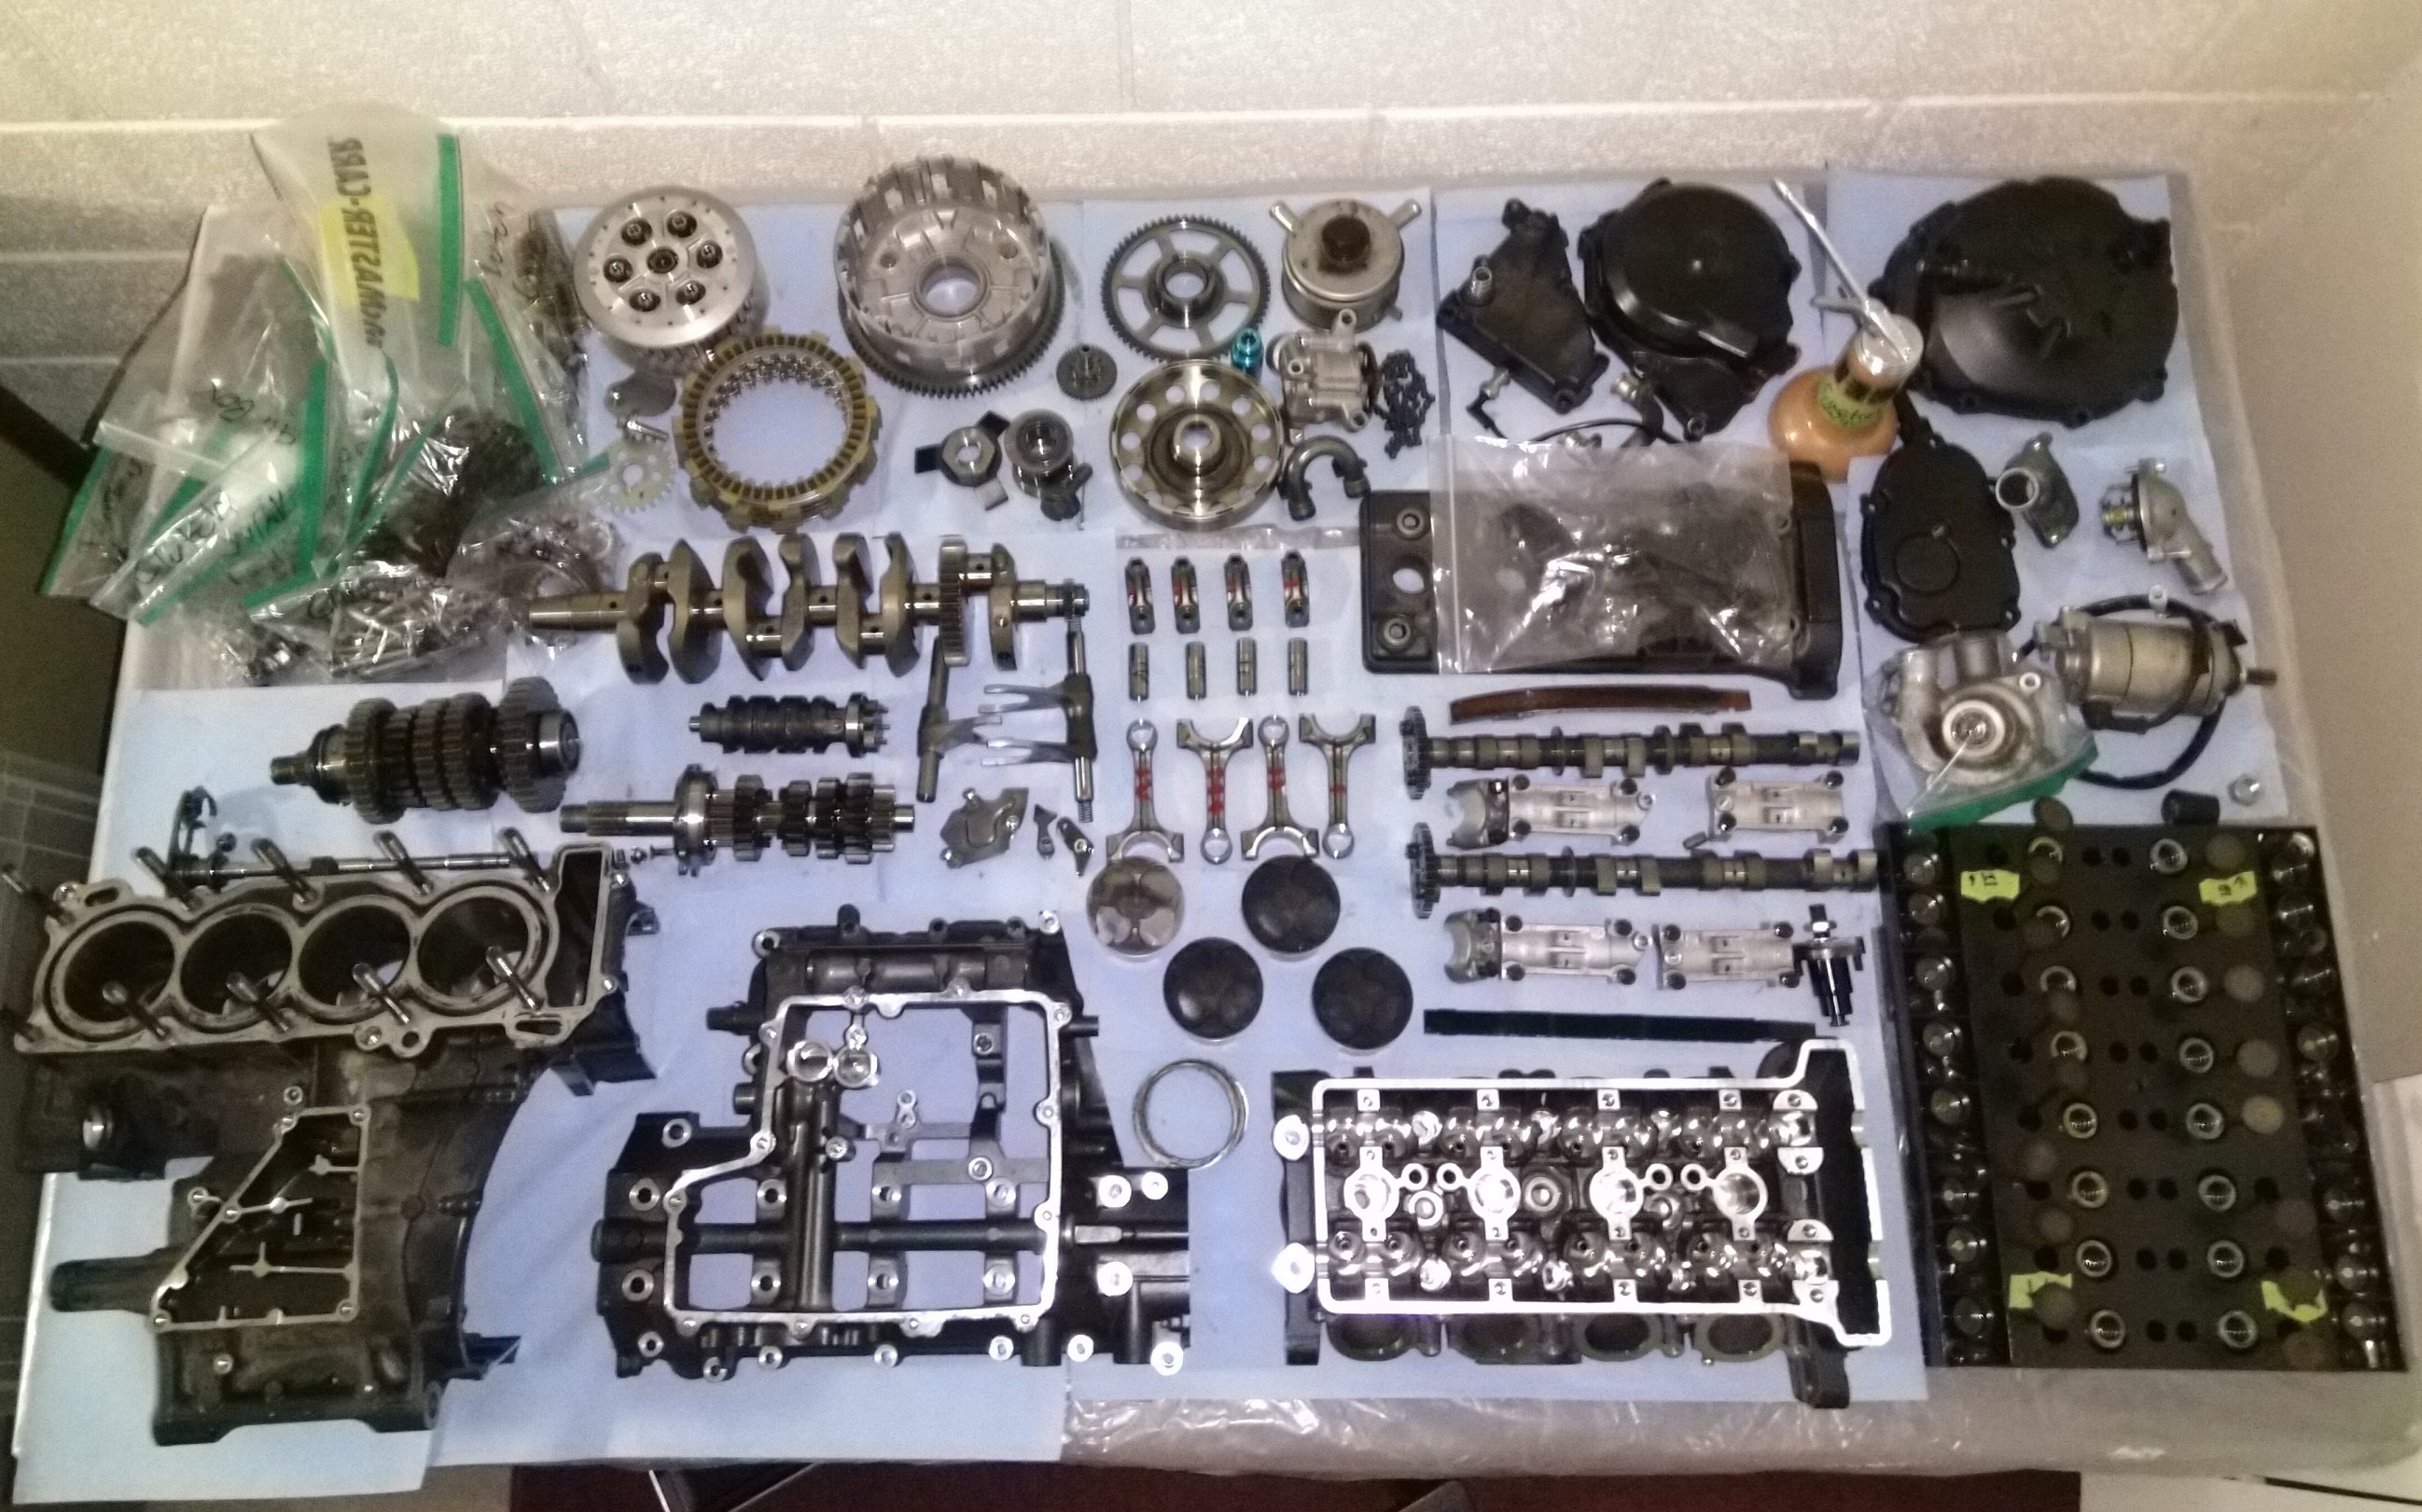
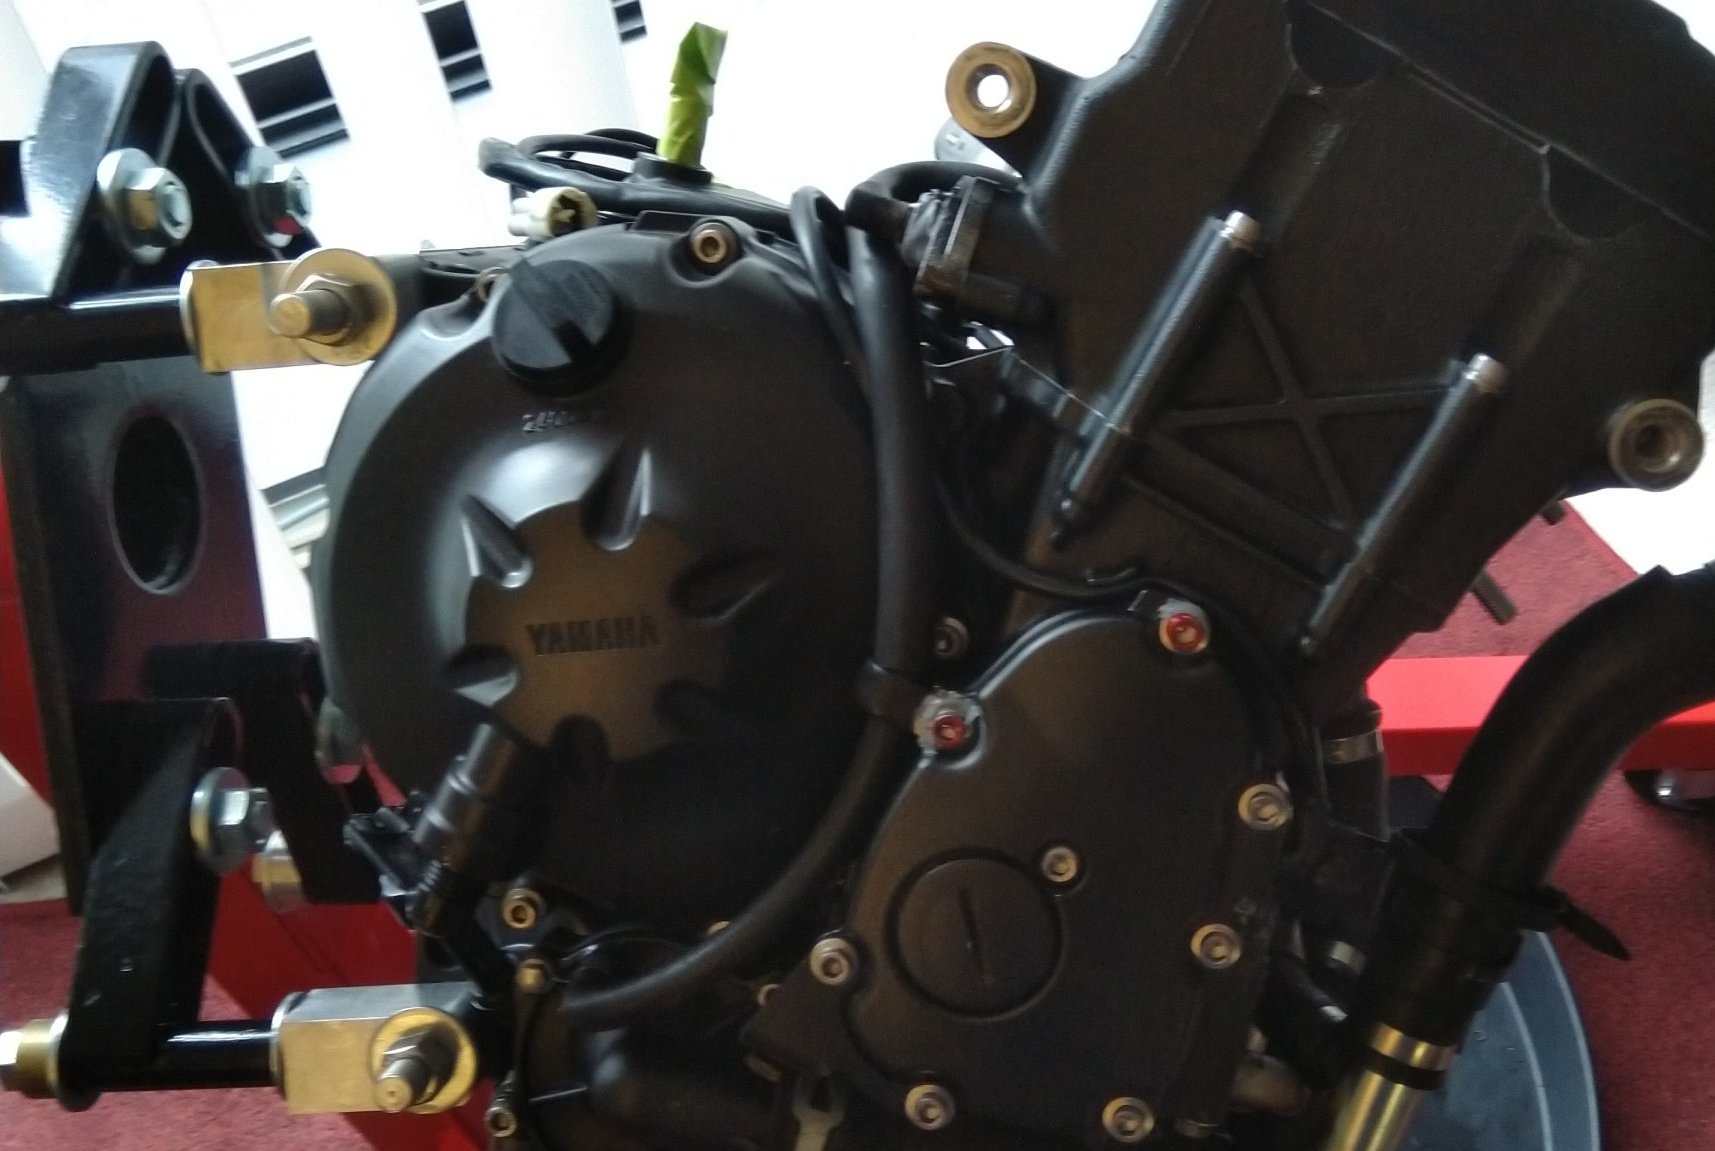
The R6 I bought was used and had ~29k miles on it. Additionally, the broken lower fairings and dents on the installed frame sliders told me that the prior owner had been… not gentle with it. This also made me suspect that maintainance was not on schedule and that the valve clearances were probably pretty tight. Despite all this, it sounded completely normal on startup and came with an aftermarket Hindle full flow exhaust (~$1600 new for a full 4-2-1 like this), so I talked the seller down ~$1000 for the fairing damage and bought it anyways. I did use the bike essentially as-bought, barring some ergonomic mods (new rearsets and handlebars) for about a year, including four weekends of track riding. The motor ran quite well on the top end (I consistently hit ~150 mph on long straights), but you could tell it needed some TLC due to inconsistent low-end performance. I suspected that compression was not stellar, which I confirmed before I removed it (150 PSI avg for all cylinders, supposed to be closer to 220 PSI). After mentally commiting to a rebuild, I pulled the motor and completely disassembled it:
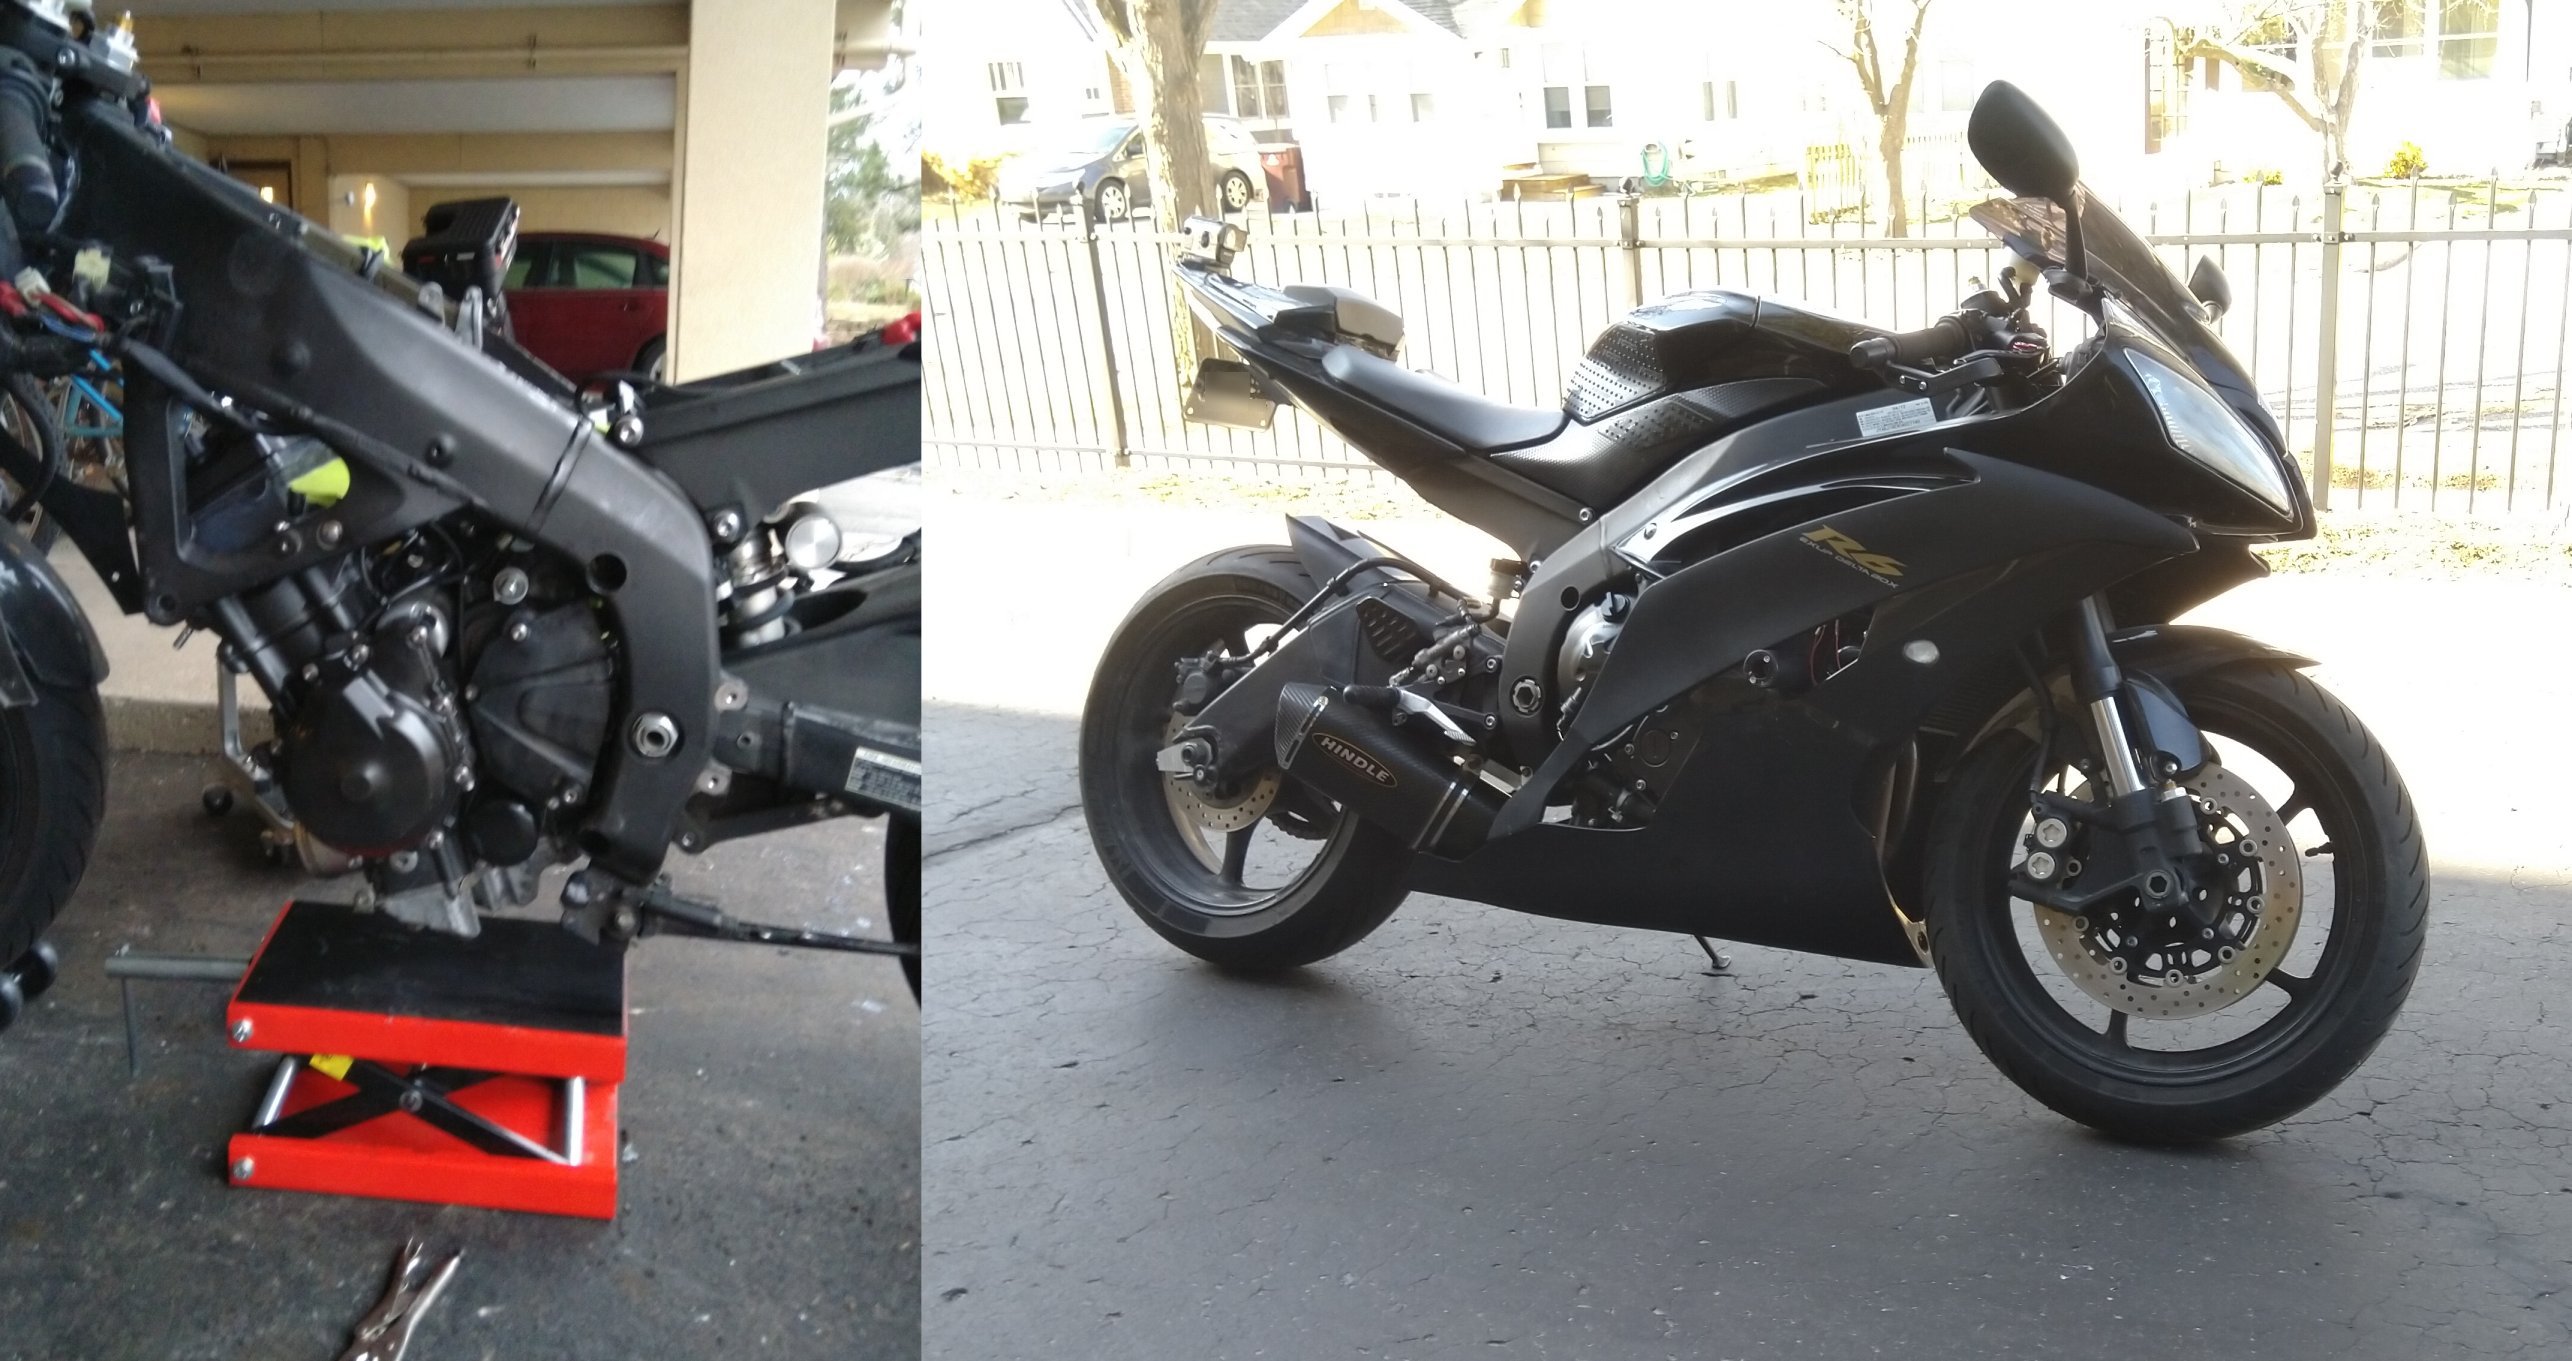
I replaced all critical bearings, o-rings, seals, and gaskets, and had any critical surfaces like valve seats, case mating surfaces, etc, cleaned and finished. The cost of purchasing all replacement bearings, o-rings, seals, and gaskets, was approximately $800 (I did not buy new valves). In an effort to provide confidence to the reader, I successfully re-assembled the engine after ~3 months of 8-12 hrs/week of work. It is presently humming away quite nicely, back in the bike:
The total monetary cost to me of doing this rebuild, including all replacement components, the purchase of specialty tools, and around 5 hours of shop labor, was approximately $1800. I likely saved at least $2000, and possibly up to $4000, of labor charges by doing almost everything myself. Additionally, I benefit from knowing everything about my machine, in terms of it’s physical condition, which will certainly help me to make informed choices moving forward.
2 Getting Started
In addition to this article series, I highly recommend watching (multiple times) the R6-specific rebuild videos from Partzilla:
These were extremely helpful, and I did use Partzilla for ordering replacement components, but you may find other vendors to be cheaper depending on what you need. The videos do gloss over some things (like rebuilding the head), and my aim is to fill those gaps here. Additionally I don’t recommend the use of a piston ring compressor, as shown in the Partzilla videos. They are installing slightly larger bore pistons and using Wiseco ring packs. The OEM ring packs, especially the oil spreader set, are very fragile. I highly recommend installing them by hand, as they are prone to getting pulled into the cylinder/ring-compressor cavity and bending, at which point you can throw that ring pack right in the trash ($30-40) (more on that in Part 3).
The rest of this article will provide a comprehensive list of things you need to get started on a rebuild. I am assuming some baseline mechanical skill here. For example, I won’t explain how to use a torque wrench, though I may recommend a specific one.
2.1 RTFM

It will be 100% bona-fide necessary to obtain a service manual (not the same as an “owner’s manual”) either from a reputable vendor or your nice Russian friends from “the internet”. This manual will have exploded diagrams of various assemblies that shows exact installation order, final torque numbers, etc, for anything you can think of. If you are not comfortable interpreting endless diagrams like this:
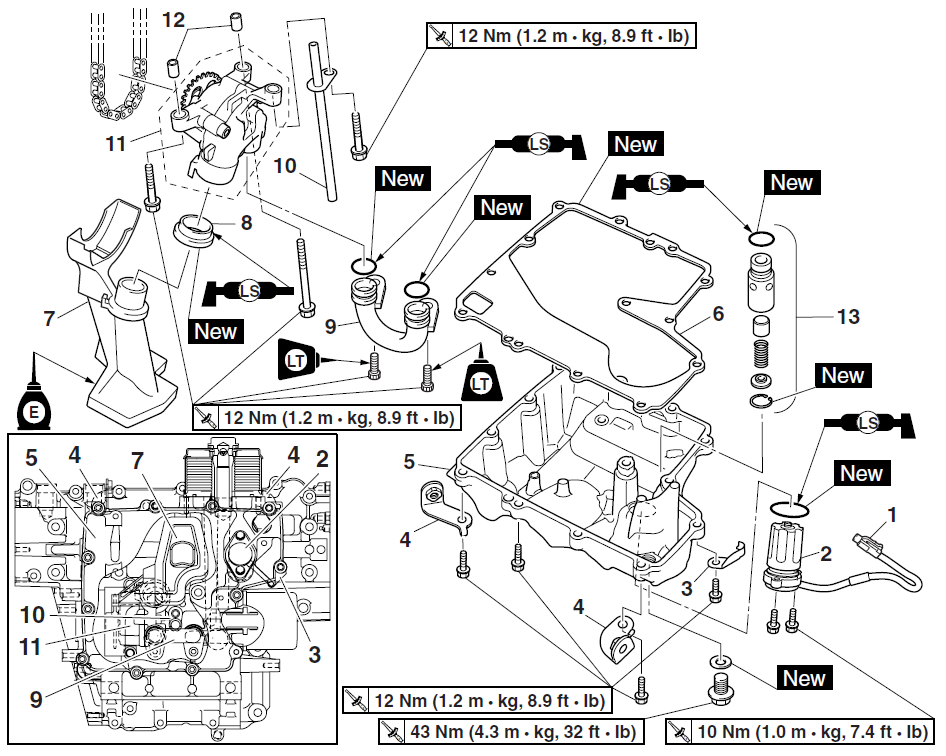
you might reconsider this project. Always RTFM, never don’t.
2.2 Essential Tooling
Motorcycles can be completely disassembled with a surprisingly small amount of tooling, certainly much less than is required for the average automobile. It is critical to use the right tool for the job. This is an aluminium engine with tight clearances. Every non-exact mechanical operation risks damage to critical surfaces and may result in eventual mechanical damage or fluid leaking.
In my opinion, every tool in this list is mandatory. Not owning these items risks damage to the engine during disassembly:
- Ratchets, 1/2” and 3/8” drive: disassembly and loose assembly.
- Breaker bar, 1/2” drive, 18+” long: disassembly.
- Torque wrench, BOTH 1/2” and 3/8”: final torquing only. Do not use torque wrenches for disassembly, and leave them disengaged when stored.
- Shallow metric sockets: 8 mm - 12 mm, just 3/8” drive is fine.
- Deep metric sockets: 17 mm - 24 mm, just 3/8” drive is fine.
- NOTE: For the 3/8” drive sockets, you may want to get a 1/2”-3/8” adapter as it may be easier working on the low end of the 1/2” torque wrench vs the high end of the 3/8” torque wrench.
- 32 mm socket, 1/2” drive: I listed this separately because it is large and likely won’t come with a set.
- T30 Torx socket: No other torx socket needed, buy 2-3 of these, I broke one removing the drive axle assembly (staked bolts).
- Standard length hex bit sockets, 3 mm - 10 mm.
- Extra length hex bit sockets, 3 mm - 10 mm.
- Extension bars, 3/8” and 1/2” drive.
- Magnetic & pivoting spark plug socket: just get it, it’s magnetic, it holds the thing good and you won‘t strip the threads and require corrective work on a $2400 valve head.
- Clutch/flywheel holder tool.
- Flywheel puller: make sure to get the puller for your model/year.
- Sheave/pulley holder: The one I bought was not large enough for my flywheel. I used some… 20 gauge? (30 thou) stainless steel and duct tape to make a longer wrap and it worked just fine, more on this in Part 2 and Part 4.
- M6-M10 stud remover/installer set.
- Piston ring expander.
- Valve spring compressor: Do NOT buy a cheap tool made from tubing from Amazon/Ebay. These often have defects and bend. Replacement Ti valves (for when you bend the stem with them) are ~$80/ea, and stems are ~$60/ea. Spend the $70+ on a compressor with solid steel construction.
- Feeler gauges: I would try to get something with 0.1 mm - 0.6 mm. More on this in Part 3.
- Steel hammer and punch: something like a 3/32” punch.
- Rubber mallet: disassembly and reassembly with gentle tapping.
Don’t feel the need to buy high end tooling. Harbour Freight level tools will be just fine unless you are a professional mechanic. I bought all of the socket gear including torque wrenches from auto parts stores for < $150 total. I estimate all rebuild-specific tools can be purchased for < $400 total. You may get some breaking of hex and torx sockets on disassembly, especially on removal of staked hardware. In that case, just buy single replacement sockets as needed. If you are working on your own, I would also get some 1” PVC pipe to use for leverage, especially for removal of the clutch basket.
The last mandatory piece of equipment is some kind of engine stand:
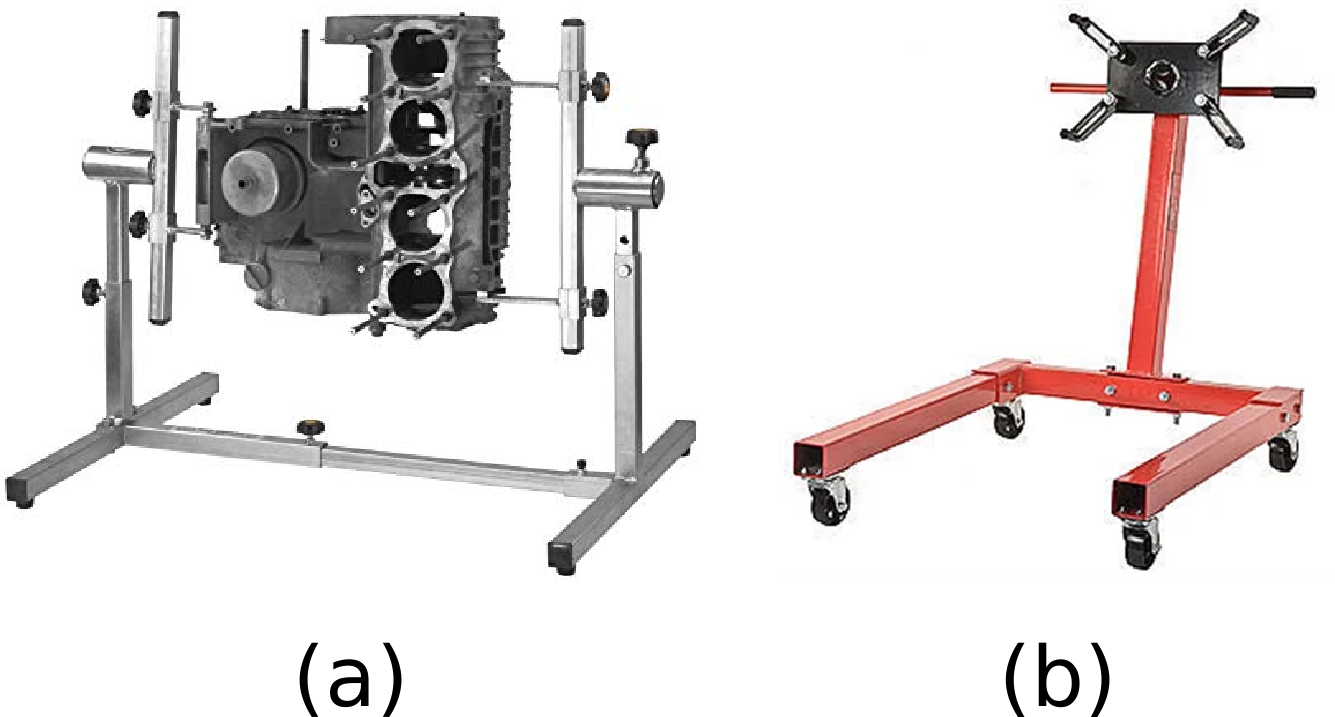
If I had a garage, I likely would have purchased the specialized stand for metric motorcycle engines as it is 100% ready to go directly out of the box. As I wanted to store the engine on my porch when I wasn’t working on it, I opted for an automotive style stand that I could roll around where needed, and fabricated some adaptive bracketry in the machine shop:
Additionally, the automotive stand was approximately 1/3 the cost of the metric motorcycle stand, and a penny saved is a penny earned.
2.3 Crucial Consumables
For those not previously aware, motor vehicles need an assortment of chemicals to operate correctly. Some of these are, in fact, actually quite toxic (the soccer moms were right). They are hazardous to your body and the environment. I recommend wearing > 5 mil nitrile gloves at all times and getting some PPE for your eyes. Please do consult your local ordinances for proper disposal of oil, coolant, and any other chemical you use in large quantities (a few oz. of diluted acetone/isopropanol down the drain is likely harmless, but a few gallons are likely the opposite). Additionally, I would avoid storing oil/chemical-soaked disposables inside. Finally, watch out for oxidizing agents (like titanium particles) interacting with your flammables.
Here are the basic consumables you will need:
- 10W30 or 10W40 mineral oil: do NOT use synthetic oil on a fresh motor. General consensus is to not use synthetic until over 6000 miles after a rebuild. You want some level of wear to ensure proper sealing (more on this in part 4). I also kept this in a dispenser for general reassembly lubrication (bolt threads, etc).
- Molybdenum disulfide grease.
- Assembly lubricant: I just used a 1:1 mixture of moly oil:engine oil that I hand-mixed in a plastic cup. This is what the service manual means by “moly oil”, they do not mean the grease itself. This mixture is for surfaces like crank bearings and valve stems. Do not use the grease alone on valve stems.
- Lithium soap grease: for o-rings, and some sealing surfaces. Keeps moisture out.
- Silicone: For four-stroke ICEs, fuel in the engine is less of a concern, so I used oil-resistant, high heat, RTV silicone for all sealing including the crankcases. Anything labeled RTV, oil resistant, and T > 650 F tolerant should be sufficient.
- High tack gasket sealant: apply this to the cover. It will hold the gasket in place. This helps with installation of the stator cover in particular.
- Brake cleaner: this will remove silicone, and most oil/grease. Use this to clean the crankcase mating surfaces before applying fresh silicone.
- Shop towels: either the blue ones, or textile if you don’t mind washing them. Don’t use paper towel, the shop towels are engineered to absorb and retain oil and other chemicals.
Additionally, you may consider the following:
- Ultrasonic cleaner: I bought a 200 W unit that heats up to 60 C for $70 on Amazon, anything a step above the models for jewelry cleaning is fine.
- Simple green (undiluted, you can dilute it yourself as you like).
- Carburetor cleaner: a mild acid good for removing carbon from metals, especially with heating/sonication.
- Acetone and isopropanol.
- Dremel tool with wire brush.
- Roloc bristle disc (get the softest one, for aluminium).
This may make cleaning carbon off some components significantly easier. I would caution against prolonged sonication of aluminium components as they tend to get pocked from cavitation. Depending on what chemical you use, they may develop a tarnish as well. However, unless you have created large holes in the metal, this will have minimal impact on operation. If the finish bothers you, you can gently hit it with the aluminium-specific bristle disc to give the surface a smooth finish. This was especially useful in cleaning the pistons (more on that in Part 3). You can gently use a wire brush on aluminium surfaces to remove stubborn buildup. For larger surfaces, the “Roloc” disc for aluminium (white in color) was quite helpful.
2.4 The Human Connection
Take a few hours to research the shops in your area. Look for dedicated motorcycle mechanics or race shops over dealerships as they are likely to be better trained and more varied in their skill set. Even if you don’t need specific work, take some time to reach out and talk to the specialists, about what you are doing. They will freely offer valuable advice. The race shops in particular will be more willing to do any “partial work” that you may need. In my case, I was comfortable doing basically everything, but I did not want to clean the crankcases and combustion chamber surfaces in my apartment bathtub… I reached out to a local shop and the mechanics there knew exactly what I needed and completed the work quickly and for minimal cost. This is well worth your time even if you don’t actually require any supplemental work.
Additionally, there are endless resources online. In particular, the fixxit subreddit community helped me be comfortable doing certain operations and provided valuable discussion. There is likely to be a dedicated forum for your specific brand (and possibly model) of motorcycle as well. Countless technical experts are lurking in the shadows of the internet, and it is up to you to rouse them with your “interesting questions”.
3 Comments
Hopefully the above information is a good supplement to help you get started. Stay tuned for the other installments. Please do use my contact form if you have any useful feedback or would like to request/suggest specific information for Part 2-5.