
GPGPU : OpenCL : Introduction to OpenCL in a Linux Environment
This article is the first in a series about developing GPGPU software. The motivation behind these articles is twofold: presenting would-be developers with a more self-contained learning example than found in the CUDA/AMD App SDKs, and also highlighting the various features of OpenCL/CUDA/whatever-else-I-decide-to-include using simple processing flows (so that readers donÆt get bogged down in algorithmic complexity). Experienced users may also notice something they were previously unaware of (as I did, during writing) and, for their benifit, I will be succinct (experienced users are encouraged to just skim or skip this first article, it is quite introductory).
Here are the relevant system specs of the development platform used to compile, execute and profile the software (for this article):
- Linux Mint 17.2 with XFCE4 and NVIDIA 352.30 display driver (manually installed) for Linux x64
- Intel i7-5930K
- HX426C13PB2K4/16
- 2x NVIDIA GTX 780 6GB SC
- GCC/G++ 4.8.4
- NVIDIA Cuda 7.0 SDK for Ubuntu 14.04 (manually installed from .run file from NVIDIA and not through Canonical repo).
The code for this software can be pulled from here. The software is a WIP, but branches used in specific articles can be assumed to stay relatively unperturbed moving forward (I will start new branches if I want to modify something for a future article). All source code and configuration files are in the repository and easy to find, with the exception of vendor-specific definitions and libraries.
1 Overview of OpenCL and SIMD Architectures
OpenCL is an API for use with the C and C++ programming languages, although Python bindings do exist for both it and CUDA. It exists to facilitate easy coding and execution of GPU/CPU instruction sets in an SIMD topology, with no knowledge of the device assembly or driver stack required. The API is maintaned by The Khronos Group, an open standards organization, which also maintains OpenGL, Vulkan, and other tools such as SPIR, WebCL, etc. Large hardware manufacturers, such as AMD, NVIDIA, Intel, ARM, Apple, Xilinx, and Altera, all collaborate and agree to adhere to the specification set by the group (for the most partģ). The vendors implement libraries (binaries and source) in their software offerings to implement the functionality specified in the OpenCL standard for their respective hardware platforms. For NVIDIA and AMD hardware, the OpenCL functions themselves are implemented in a precompiled binary (libOpenCL.so) that is issued along with the driver. This library handles the interface between the API and the device driver and is often proprietary.
Using the terminology in FlynnÆs Taxonomy, OpenCL operates as an SIMD (Single Instruction Multiple Data) architecture. SIMD architectures allow for synchronized, but concurrent, instruction execution and memory access for all processing cores, as shown in fig1. Each processing core is given the same instruction set, with some variation of memory access/compute structure based on things like thread ID, work group ID, etc.


In comparison, MIMD (Multiple Instruction Multiple Data) architecture allows for independent instruction execution and memory access for all processing cores, as shown in fig2. Modern desktop/server CPUs have MIMD capability, and are often classified as MPMD (Multiple Program Multiple Data). Desktop CPUs, however, can also function as SIMD devices, hence the OpenCL support for Intel CPUs and AMD CPUs/APUs.
OpenCL offers a high level set of functions to compile and execute a device-specific instruction set written in a common syntax: OpenCL C. As shown in fig3, the API shows the user available OpenCL contexts (a related set of useable OpenCL-supported devices) in the overall platform, and makes it possible to queue memory and device operations. The instruction set executed by a device is called a kernel (definition), and is written in OpenCL C and compiled to a vendor-specific instruction set. As shown in the bottom half of fig3, the kernel instruction set is executed on every work item, which is an individual processing thread executed on a single core. The processing cores are bundled into work groups, which abstract to a streaming multiprocessor (SMP): a collection of processing cores that share a smaller memory pool and other I/O and processing peripherals. Every one of these processing cores is assigned a global and local ID. These IDÆs are typically used as generators for various operations or memory access indeces, so that individual processors can work on different sections of global/local memory (otherwise there would be no point to this entire hardware architecture). Processors do have some private memory which is not accessible to any other thread, but this is typically small (16-48 KB) and requires careful management.

The GPU die has several SMP units, and they all share I/O for global memory access. Global memory is typically the reported ōvideo memoryö or ōgraphics memoryö on a GPU device. For example, the GPUs used here have ~ 6 GB GDDR5. There are OpenCL functions that report specific device features, such as supported OpenCL version, and even things like maximum supported work group sizes and maximum single buffer sizes. For example, some output from one of my devices:
OpenCL 1.2 CUDA 7.5.15
Device Name: GeForce GTX 780
Max Compute Units: 12
Max Work Group Size (x*y*z): 1024
Max Work Item Sizes (x, y, z): 1024, 1024, 64
Max Mem Alloc Size: 1610563584
This means that my GPU has 12 SMP units. Given the number of compute cores per GPU, we can see that the number of cores per SMP is 192. The number of threads that can execute per SMP is dependent on various bottlenecks, which wonÆt be discussed here. ItÆs also important to note that each SMP launches threads in bundles called ōwarpsö, and that the warp size is hardware dependent. We wonÆt be discussing the particulars of utilization here (saturating the thread count per SMP), instead reyling on the OpenCL runtime to optimize utilization by passing cl::NullRange to the work group size argument of enqueueNDRangeKernel.
2015-09-18: I had incorrectly stated that the thread count is equal to the core count per SMP, this is not the case. The number of concurrent threads launched per SMP at any given time is dependent on a lot of factors. Please see my CUDA tutorial for more info on utilization, etc.
Work Group Size refers to the local_work_size parameter passed to kernels, as shown in fig3. Note that there is no limit on the Global Work Size, nor the number of Work Groups (which is inferred from global_work_size and local_work_size by the OpenCL API). Code written for the GTX 780 can not exceed maximum work group dimensions of (1024, 1024, 64), and, at the same time, the work group ōvolumeö can not exceed 1024 (total number of items in the work group). Additionally, it is not possible to allocate more than ~1.61 GB for a single memory buffer, even though anywhere near that size may not be practical (I wonÆt get into caching and segmentation issues here; maybe in a later article).
Protip: good OpenCL code rarely, if ever, hard-codes the global/local work sizes and buffer sizes, unless there is an extremely good reason for it. Device-specific parameters are usually collected at the start of the program, and are used to generate container sizes and execution parameters.
For convenience, Khronos has produced a handy set of reference cards for OpenCL types, classes, functions, etc. The OpenCL specification, and the manual for the C++ bindings are also well written.
2 Installation
Installation instructions for the complete development environment are presented for Debian-esque distros. Please refer to Google should these instructions not apply for your operating system. To compile C++ and OpenCL code, you will need several libraries/toolchains. Please Google the installation instructions if there are any ambiguities. The following items are mandatory to compile basic OpenCL software:
- GCC/G++ - GNU compilers for C, C++. Any recent version should work.
- libOpenCL.so - A precompiled binary containing the actual hardware-specific OpenCL functions and driver interface for a particular vendor. This is usually found in a driver package.
- OpenCL C definitions and C++ wrapper - The OpenCL definitions are included in vendor SDKs and the C++ bindings can be downloaded from the Khronos website.
- Source code for learnOpenCL - My repository is on github, simply clone it to a local directory. The branch used in this article is named simple_events. Other branches are not used here.
IÆve put together some basic setup guidelines for new users. If you know better, please feel free to ignore them.
2.1 Display Driver
Just in case you havenÆt manually installed an NVIDIA graphics driver in linux before, there are several steps:
- Remove previous drivers and disable Nouveau from loading.
- Download latest or desired NVIDIA graphics driver.
- Disable the display manager (gdm, lightdm, mdm, etc) and install the driver.
- Reboot
Follow these instructions to disable nouveau.
Download the appropriate display driver for your hardware and operating system. I recommend getting either the .run or .deb files from the vendorÆs website, as opposed to installing from your linux distributionÆs repositories. Then, press CTRL+ALT+F1 to enter tty1, log in, and run the following (substitute the appropriate display manager for lightdm):
sudo service lightdm stop
sudo apt-get purge nvidia* #if you have a previous driver installation.
cd ~/Downloads
and, depending on what kind of driver file you got, either:
sudo chmod +x NVIDIA<version>.run
sudo ./NVIDIA<version>.run
or
sudo dpkg -i NVIDIA<version>.deb
followed by a sudo reboot. If you have two or more GPUs, you may not want to run them in SLI/Crossfire mode depending on what kind of OpenCL code you want to execute. To see device concurrency in this example software, SLI mode is disabled (you may have to restart at least the X server to effect these changes).
The AMD driver is installed similarly (called ōAMD Catalystö), and Nouveau should be disabled by default if AMD hardware is detected.
The driver installation should have created libOpenCL.so in /usr/lib/x86_64-linux-gnu/ or equivalent. If libOpenCL.so is not in one of the directories spit out by ldconfig -v, please find its location and append it to LIBRARY_PATH and LD_LIBRARY_PATH system variables.
NOTE: Depending on the distribution and version of linux installation, I did have problems loading some drivers from boot (before the splash screen). If that is the case, add the *nomodeset* flag to your bootloader entry for linux and remove quiet splash (or just splash if you donÆt want to see log outputs).
2.2 SDK
Either the CUDA or AMD APP SDK needs to be installed so that the relevant OpenCL definitions (in C) are availabel. There are numerous ways to install these SDKs and, recently, various linux distros support installing them piecewise from the package managers. For example, in ubuntu based distros:
$ apt-cache search cuda
...
cuda-samples-6-5
...
cuda-cufft-dev-7-0
cuda-cudart-dev-7-0
...
Google can help you find the most appropriate installation method for your particular system. I personally download the .run file from the CUDA Downloads page.
2.3 C++ Bindings
The source for OpenCLÆs API functions in AMD and NVIDIAÆs SDKs is coded in C. Because this isnÆt 1982, please grab the C++ wrappers for OpenCL from the Khronos website. One can download it manually (the filename is cl.hpp), or use wget (much more professionalģ):
cd /usr/local/cuda/include/CL
sudo wget https://www.khronos.org/registry/cl/api/1.1/cl.hpp
In either case, the headers should match the OpenCL version supported by the hardware drivers. In a nutshell, using C++ data structures is nice for readability and inter-operability with the latest C++ feature set. The C++ wrapper also automatically deallocates all relevant memory, device and context objects upon destruction. Additionally, there is support for iterator classes (std::vector, etc), which makes complex cl::Event managment easier. The C++ wrapper does a great job of removing tedium from the coding process.
3 Compilation
Compilation of the C++ code and library linking is done with GNU Make. The Makefile is configured to iterate through the root directory and find .cc files, compile them into binaries, and then link them (along with libOpenCL.so and any other desired binaries) into an executable named ōprogramö (IÆm great at naming things). To compile learnOpenCL, simply run the following in the repositoryÆs root directory:
git checkout simple_events
make clean program
ItÆs fine if there is nothing to clean, the build will continue. For those of you familiar with GDB, an executable with debug symbols called ōdebugö can be compiled with:
git checkout simple_events
make clean debug
and ran in gdb:
gdb debug
(gdb)$ run <args>
should you want to debug/analyze the code. In the shell, the actual compiler calls look like this:
g++ -Wall -ansi -pedantic -fPIC -std=c++11 -c handler.cc -o lib/handler.o -pthread -std=c++11
g++ -Wall -ansi -pedantic -fPIC -std=c++11 -c main.cc -o lib/main.o -pthread -std=c++11
g++ -Wall -ansi -pedantic -fPIC -std=c++11 -c oclenv.cc -o lib/oclenv.o -pthread -std=c++11
g++ -Wall -ansi -pedantic -fPIC -std=c++11 -o program lib/handler.o lib/main.o lib/oclenv.o -lOpenCL -pthread -std=c++11
If you are uncomfortable with GNU make and you want to try different compiler options without reading or re-reading the specification, you can copy and paste the four lines above into a bash script (put ō#!/bin/bashö as the first line and then paste the rest) and modify that instead.
If you are experiencing library loading/linking errors, check to see what libraries your executable is linked to, it should look something like this:
$ ldd program
linux-vdso.so.1 =>  (0x00007ffca97f2000)
libOpenCL.so.1 => /usr/lib/x86_64-linux-gnu/libOpenCL.so.1 (0x00007f1ef4443000)
libstdc++.so.6 => /usr/lib/x86_64-linux-gnu/libstdc++.so.6 (0x00007f1ef413f000)
libgcc_s.so.1 => /lib/x86_64-linux-gnu/libgcc_s.so.1 (0x00007f1ef3f28000)
libc.so.6 => /lib/x86_64-linux-gnu/libc.so.6 (0x00007f1ef3b63000)
libdl.so.2 => /lib/x86_64-linux-gnu/libdl.so.2 (0x00007f1ef395f000)
/lib64/ld-linux-x86-64.so.2 (0x00007f1ef4672000)
libm.so.6 => /lib/x86_64-linux-gnu/libm.so.6 (0x00007f1ef3658000)
It makes sense that you should link to the driverÆs version of libOpenCL.so, as it is possible to use source from newer/older CUDA SDKs with older/newer drivers, and you donÆt want to roll back essential bug fixes from NVIDIA for no reason.
4 Execution and Profiling
I will save elaboration on the OpenCL program structure for the next article. Instead, I will discuss the specific program IÆve written for this set of tutorials and its execution and profiling. The software is called ōlearnOpenCLö and it compiles into one of two executables: ōprogramö and ōdebugö, with and without debug symbols, as explained above. Essentially, the program just creates a two very large buffers full of uniformly distributed random numbers in [0, 1] and then adds them. At the end of the program, there is a check of 20 random entries to make sure there were no issues with memory access and that you arenÆt reading/operating on garbage data. The program splits the work between available GPU devices, and allows for specification of specific devices to use. CPU based execution may be covered in a later article.
Note: This is the first time IÆve had a chance to use generators and distribution functions from std::random (C++11) and they are better than sliced bread.
The program in the simple_events branch has three arguments:
- datasize : the size of each input/output buffer for a single device in MB. Be careful when specifying this, as it allocates 3x this size host-side per device. For example, if I specified -datasize=1000, it would allocate 6GB of memory on my machine (two GPUs). This a) takes forever, and b) if I had less than 6 GB available, the program would exit with something like std::bad_alloc.
- chunksize: the size that a single kernel call operates on. datasize should be an integer multiple of chunk size
- gpus : a list of gpus that you want to utilize. You can feel free to put whatever here, if the list of numbers you specify is in the range of
oclenv.ocl_devices.size(), that GPU will be used. There is input buffering in the oclenv class to protect against nonsensical or double entries. For example, if I have 4 gpus, specifying anything in the range of 0-3, such as-gpus=0,1,3is valid.
For now, lets execute on a single GPU. After running ./program -gpus=0, you should see something similar to the following:
OpenCL Environment Initialized.
OpenCL 1.2 CUDA 7.5.15

Local OpenCL Devices:
  DEVICE
  Device Name: GeForce GTX 780
  Max Compute Units: 12
  Max Work Group Size (x*y*z): 1024
  Max Work Item Sizes (x, y, z): 1024, 1024, 64
  Max Mem Alloc Size: 1610563584

  DEVICE
  Device Name: GeForce GTX 780
  Max Compute Units: 12
  Max Work Group Size (x*y*z): 1024
  Max Work Item Sizes (x, y, z): 1024, 1024, 64
  Max Mem Alloc Size: 1609744384

Create CommQueue, Device: 0
Create CommQueue, Device: 1
N_GPUs: 1
OpenCL CommandQueues and Kernels ready.
Total Input Size: 100.000 (MB), GPU Size: 100.000 (MB),     Compute Chunk: 10.000 (MB), Total Array Size: 25000000, GPU Array Size: 25000000
Generating random number sets...

Number sets complete.

N Chunks: 10, Chunk Buffer Size: 10000000 (B)
100.00% complete
Testing 20 random entries for correctness...
Entry 14674234 -> 0.6708 + 0.1199 = 0.7906 ? 0.7906
Entry 22936796 -> 0.0884 + 0.0128 = 0.1013 ? 0.1013
Entry 12799297 -> 0.2921 + 0.6547 = 0.9468 ? 0.9468
Entry 15718569 -> 0.7520 + 0.1485 = 0.9005 ? 0.9005
Entry 16246963 -> 0.7845 + 0.0469 = 0.8314 ? 0.8314
Entry 3855776 -> 0.3704 + 0.0934 = 0.4638 ? 0.4638
Entry 554074 -> 0.5694 + 0.1523 = 0.7217 ? 0.7217
Entry 14983718 -> 0.6257 + 0.2859 = 0.9116 ? 0.9116
Entry 19944209 -> 0.1956 + 0.4506 = 0.6462 ? 0.6462
Entry 18031802 -> 0.4970 + 0.6025 = 1.0994 ? 1.0994
Entry 12666540 -> 0.4740 + 0.7365 = 1.2105 ? 1.2105
Entry 7760524 -> 0.0767 + 0.3610 = 0.4376 ? 0.4376
Entry 15710979 -> 0.2664 + 0.5677 = 0.8341 ? 0.8341
Entry 15003214 -> 0.2554 + 0.3941 = 0.6495 ? 0.6495
Entry 19185088 -> 0.4102 + 0.5316 = 0.9418 ? 0.9418
Entry 18056165 -> 0.5290 + 0.5392 = 1.0682 ? 1.0682
Entry 17901486 -> 0.5920 + 0.4586 = 1.0506 ? 1.0506
Entry 20454050 -> 0.0001 + 0.1481 = 0.1482 ? 0.1482
Entry 22255658 -> 0.4926 + 0.4101 = 0.9027 ? 0.9027
Entry 9725284 -> 0.4544 + 0.3159 = 0.7703 ? 0.7703
Though NVIDIA actually disabled OpenCL profiling support in their visual profiler (NVVP) a few CUDA SDKs ago, we can use some clever tricks to trick it into working. Kudos to James Price from University of Bristol for outlining this method. DonÆt worry about setting this up yourself, I have included configuration files and a sed-based parser script to dump logging, when enabled, to a file called ōcuda_profile.logö in the root directory. To generate this file, simply run
./profiling.sh <args>
in the root directory, where args are the specified command line arguments for ōprogramö. Then, to look at the profiling data, run
nvvp cuda_profile.log &
which should display something like fig4.
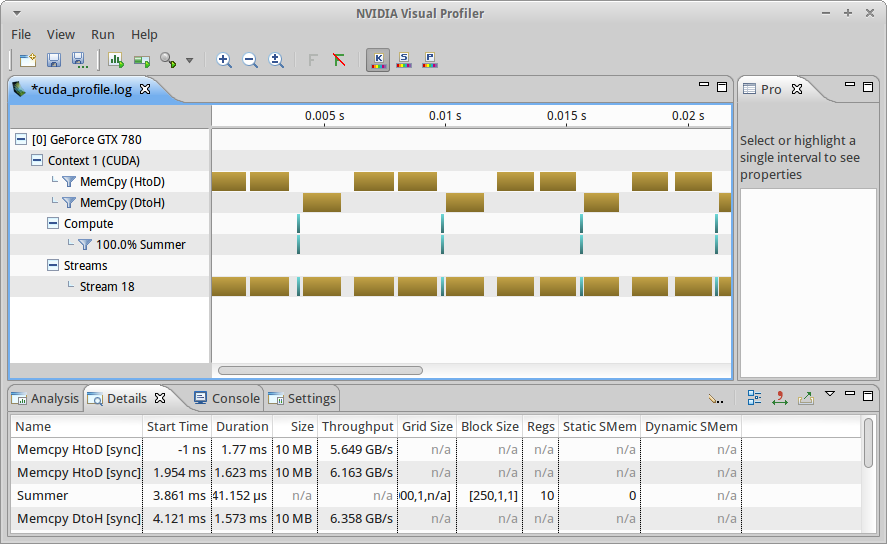
./profiling.sh -gpus=0.We can see that, in the simple_events branch, most of the execution time is dedicated to memory transfers instead of compute. Summing up the total execution time shows that it takes the GPU ~1.4 ms to sum 100 MB buffers (see how long it takes your CPU). The proportion of memory to compute operations isnÆt necessarily something that can be improved, but it is often possible to employ various tricks which balance the proportion of these operations or make them more concurrent.
Note: At the time of writing, there seems to be a bug in the NVIDIA driver that prevents concurrent execution of Command Queues across multiple devices, as discussed here. This is potentially a huge problem, as it is in direct contradiction to the OpenCL specification, which NVIDIA officially claims to support (page 26):
It is possible to associ ate multiple queues with a single context. These queues run concurrently and independently with no explicit mechanisms within OpenCL to synchronize between them.
I have since filed a bug report on the developer zone and it is currently being examined by engineering. I will write an entry about this in the future. For now, beginners should continue to familiarize themselves with the basics, and experienced users can hold off while I wait for this to be resolved.
5 Conclusion
This was a simple introduction to the OpenCL API. At this point, readers should have executed the simple_events branch of learnOpenCL and viewed the profiling output. Experienced users should either have skimmed this article for itÆs basic points, or skipped it entirely.
The next article in this series will examine the structure of an OpenCL program, and discuss some basic techniques for improving program efficiency.
I will also release a companion article to this one, which implements the same summing program, but in CUDA. Device concurrency works properly in CUDA (not surprising), so I may do that first, as I wait for the bug mentioned above to be resolved.
6 References
- 1 Colin M.L. Burnett, ōFlynnÆs Taxonomy of an SIMD designö. Retreived from https://en.wikipedia.org/wiki/File:SIMD.svg on 2015-08-04.
- 2 Colin M.L. Burnett, ōFlynnÆs Taxonomy of an MIMD designö. Retreived from https://en.wikipedia.org/wiki/File:MIMD.svg on 2015-08-04.