
HDPlex H1 V3, Fanless HTPC Build & Benchmarking
I updated my home theater PC (HTPC) into a low-power, small form factor, completely fanless silent PC capable of streaming local and online movies at 4K resolution, and performing minor compute tasks. I was previously using my old ATX PC based around a Xeon X5660, which was pulling 50-60 W just idling. In addition to being old, power hungry, and bulky, the DDR3 memory modules have started failing, further motivating replacement. This build is based around an HDPlex mini ITX chassis that is designed for 65 W TDP processors. In addition to benchmarking thermal performance on common media tasks, I run a stress test to maximize the case temperature and push the limits of the chassis’ heat dissipation ability.
1 Components
Let’s go over the things going into this build. The prices I paid may be higher or lower than real-time prices due to sale timing, etc, but they are probably pretty accurate.
Actual electronic computer components:
- AMD Ryzen 5 3400G ($140): 4C/8T, 3.7 GHz base, 4.2 GHz boost, Zen2, 12nm FinFET. 65 W TDP. Vega 11 GPU. More than enough for a 4k HTPC.
- ASRock B450 Gaming-ITX/ac Motherboard ($130): Bare bones mini ITX board. HDMI 2.0 (4k/60fps). Compatible with case, low profile components and clearance for heat pipes.
- Corsair Vengeance LPX 16GB (2x8GB) DDR4 2933 MHz CL16 Memory ($60): Cheapest 2933 MHz kit I could find. I typically buy the exact CPU supported speed unless I am overclocking.
Why AMD over Intel? No real preference. I have never owned an AMD system before and heard good things about Zen2. I also was curious about how a full AMD PC behaved with my Arch linux build. I would have been equally satistifed running an i5-7400, though it would have cost about $100 more for an equal Intel system. For a boot drive, I simply pulled my SSD from my old system into my new one, so it was “free” in a sense, but a new 250 GB SSD is around $50 new and often quite less than that on sale/clearance.
Case/heatsink (same thing):
- HDPlex H1 V3 ($215)
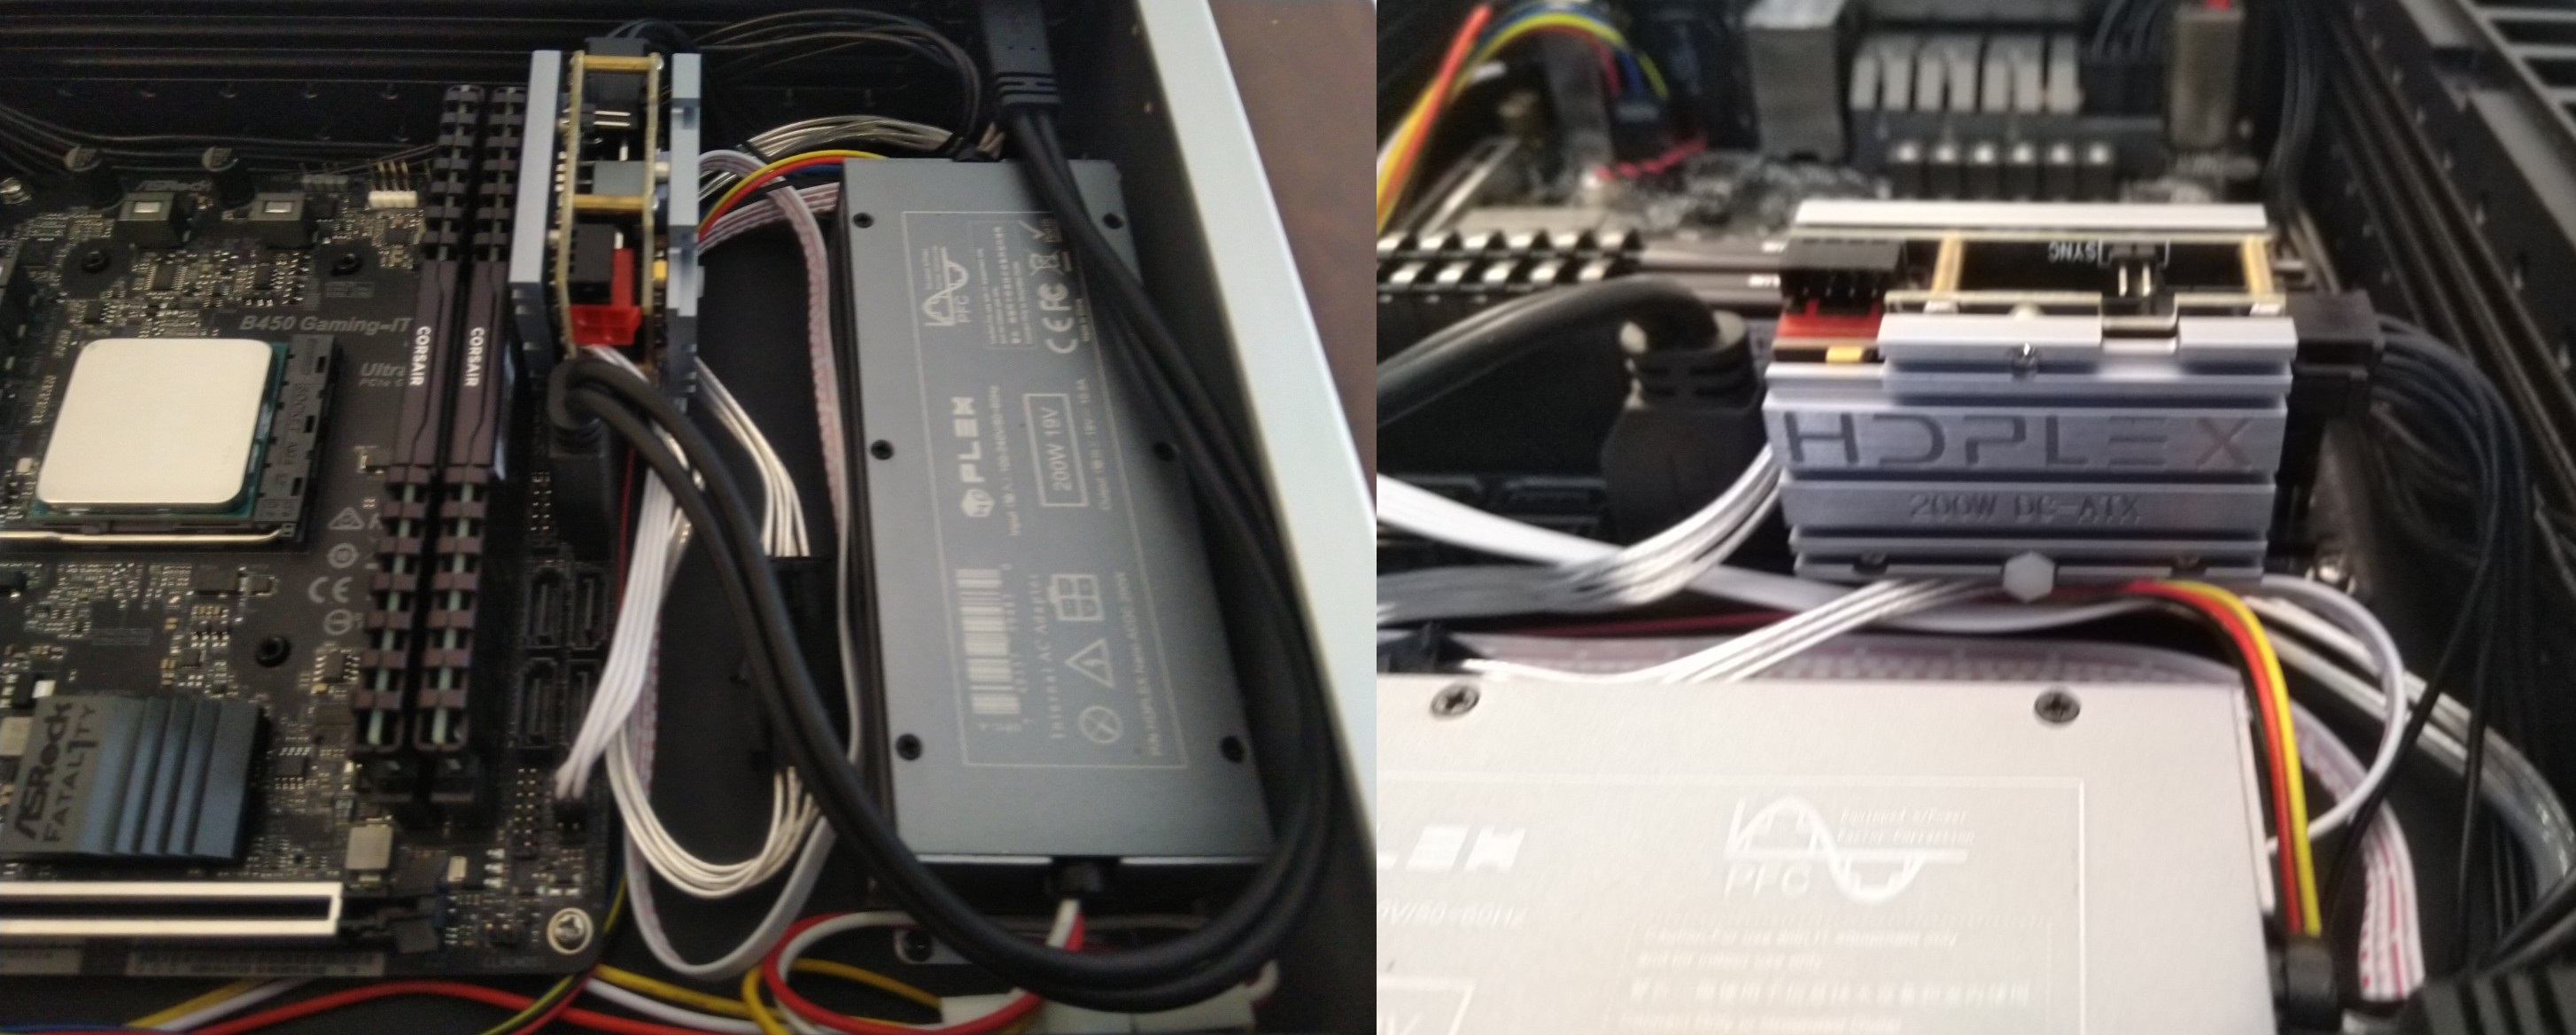
- HDPlex 200W AC-DC ($65): Takes 120V AC from the wall and puts out 19 V DC up to 200 W.
- HDPlex 200W DC-ATX ($55): Takes 16-24V DC input and distributes the 12V, 5V, and 3.3V power up to 200 W. Plugs directly into the ATX connector on the motherboard, and has separate outputs for 12V 8-pin CPU power, 5V SATA, etc.
The HDPlex components are all passively cooled, meaning there is no forced air flow via fans, etc. All components rely on thermal conduction and static air convection to remove heat. The power supplies are engineered for >94% efficiency, and do not dissipate much heat even at full load. The DC-ATX converter was actually quite difficult to find, as they are particularly popular. I had to send asst. individuals emails to round up a used one that I bought for $55.
The total cost of the actual computer components is $330. The fanless case and fanless/small-form-factor 200 W PSU’s run $335 combined. That’s right, the case is more expensive than the actual computer! That’s not commonly the case, but it will be easy to see why during the build. The case is machined billet aluminum with custom made cooling blocks and heat pipes. Typical PC cases are sheet metal with plastic trim (yes, some have tempered glass windows), making it easier to cost-engineer.
For the operating system, I am running a bare bones Arch linux build based around the i3 tiling manager. The steady state memory usage is < 500 MB. The 16 GB RAM is quite excessive, (I’m not a 300 Chrome browser tabs kind of guy…) but it was the cheapest 2933 MHz kit I could find (the official supported speed for this CPU). Let’s put this all together and see how hot it runs.
2 Assembly
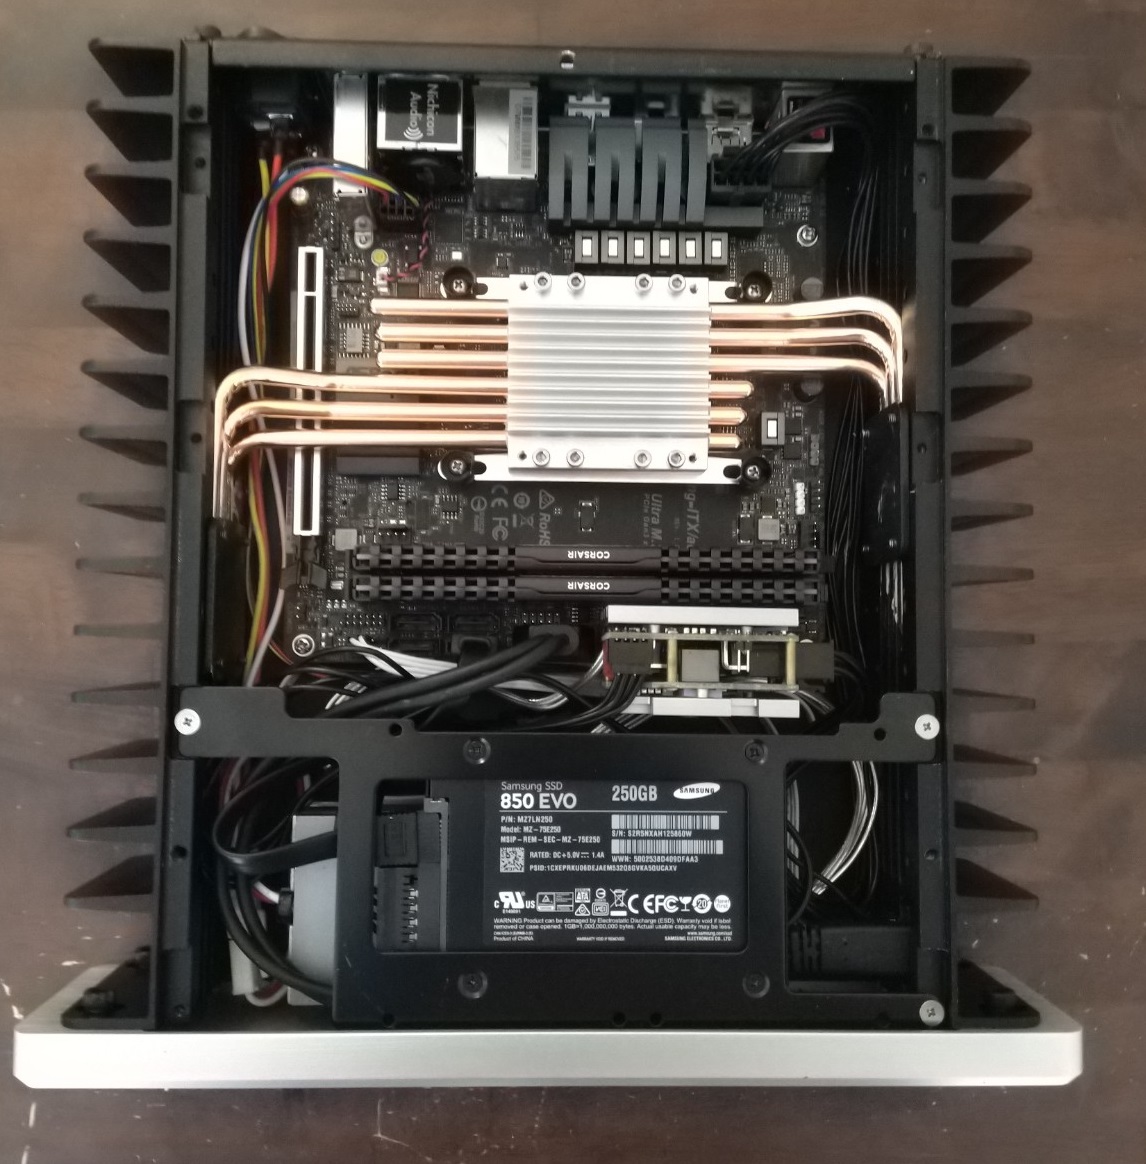
First, the case needs to be assembled. The included instructions were simple and complete. I would personally leave the cases bolts all slightly loose until the heat pipes are fully tightened in order to ensure fitment. After case assembly, I installed all of the electronic components (sans SSD). Cable management is not really a thing here as space is incredibly tight. My main aim was to get the cables away from the heat pipes and not have them block any venting holes.
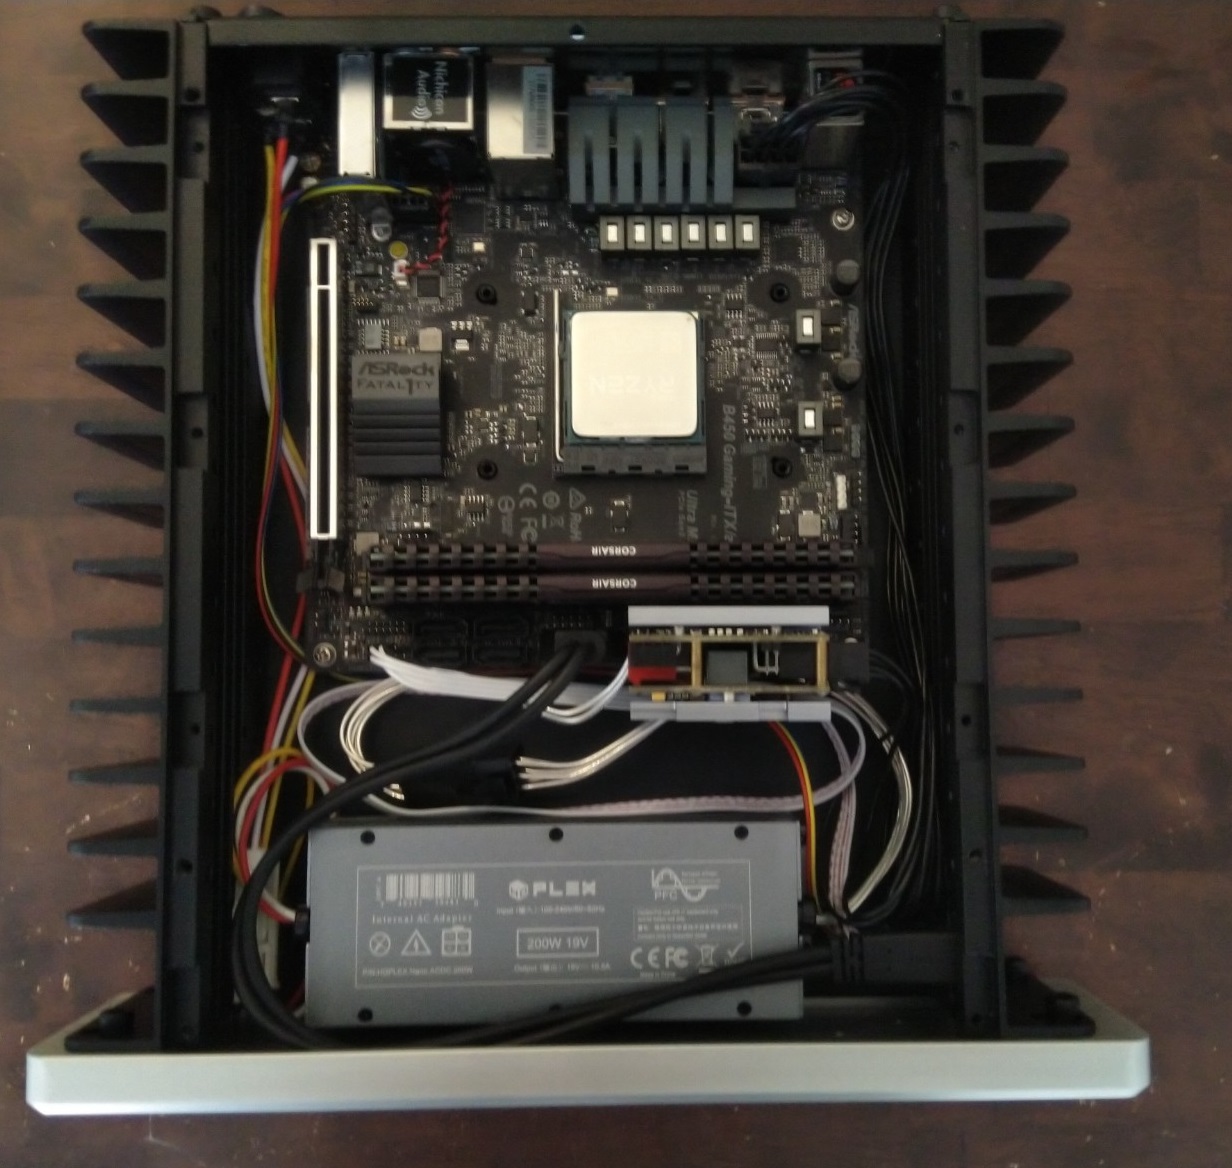
My first impression is that the case is basically a solid aluminum brick (because it actually is). The front faceplate looks incredibly nice and has a striking brushed texture. It also weighs several pounds! This is basically a block of aluminum with screw holes and fins. The AC-DC converter bolts directly to the case floor to allow thermal transfer. The DC-ATX unit plugs directly into the 24-pin ATX connector on the motherboard and is sufficiently cooled by the double-sided aluminum faceplates.
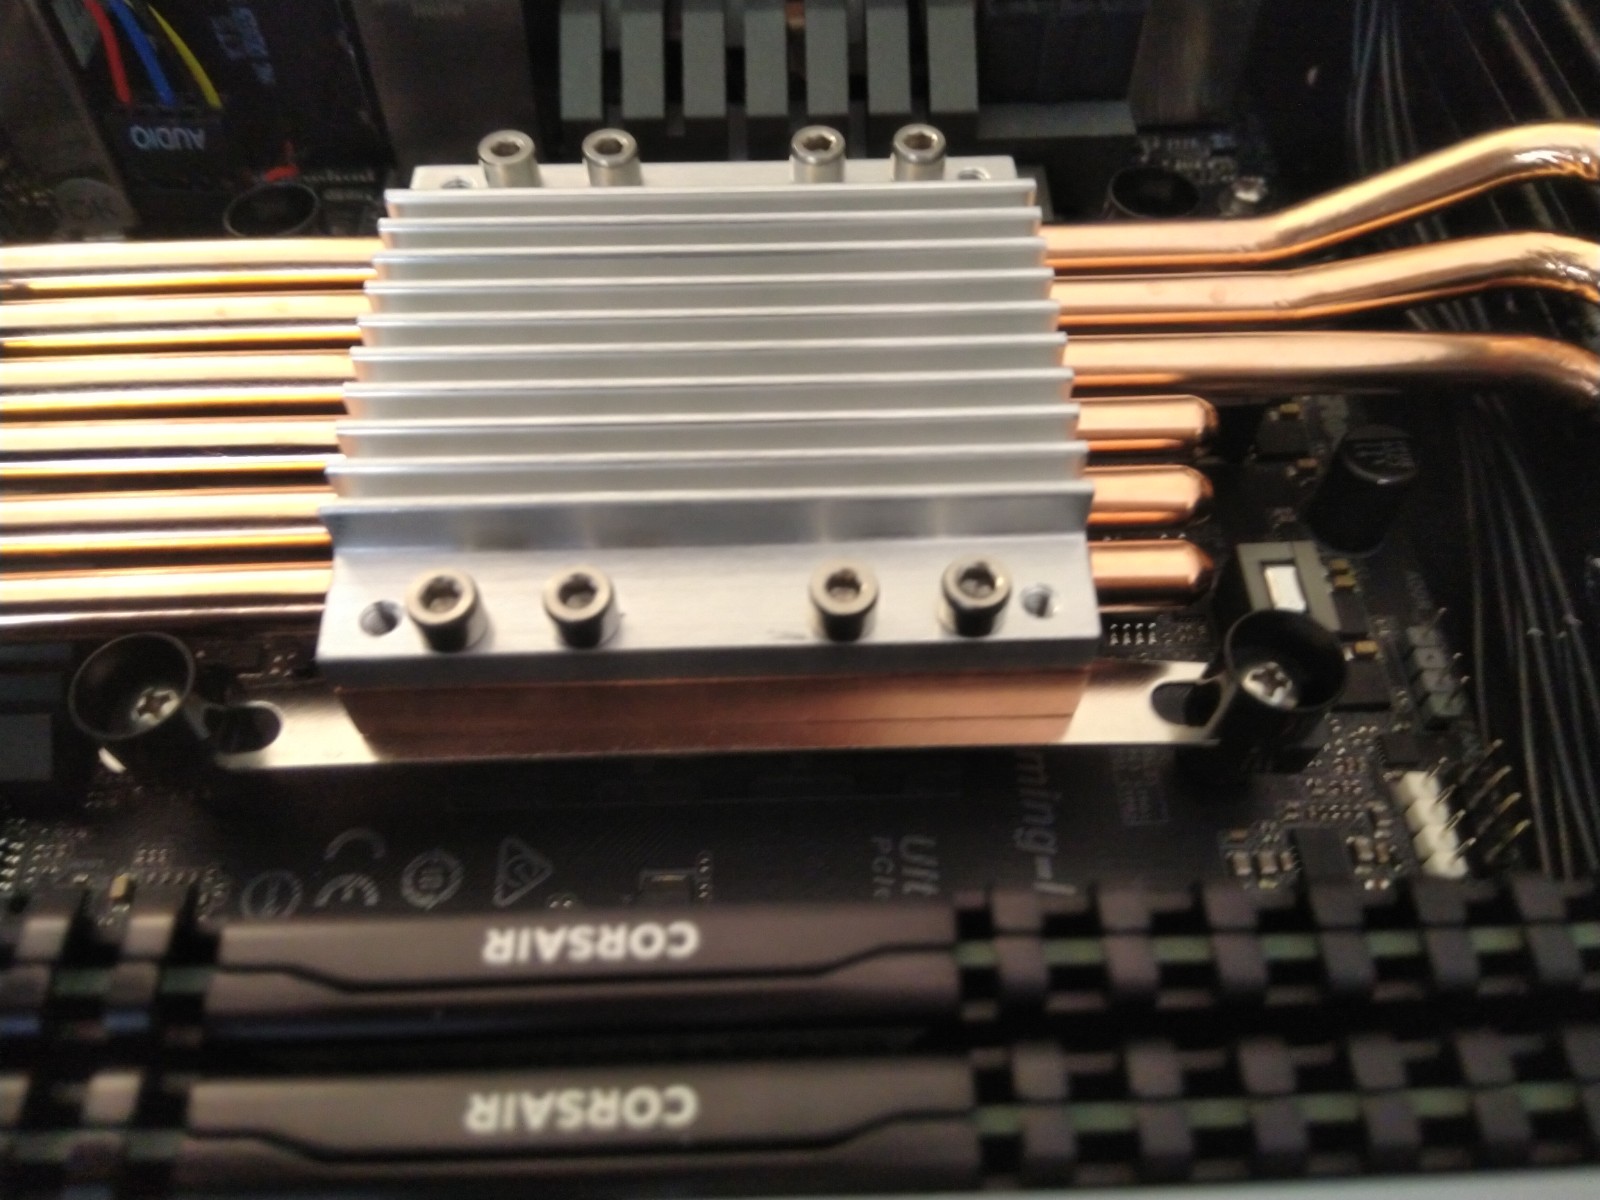
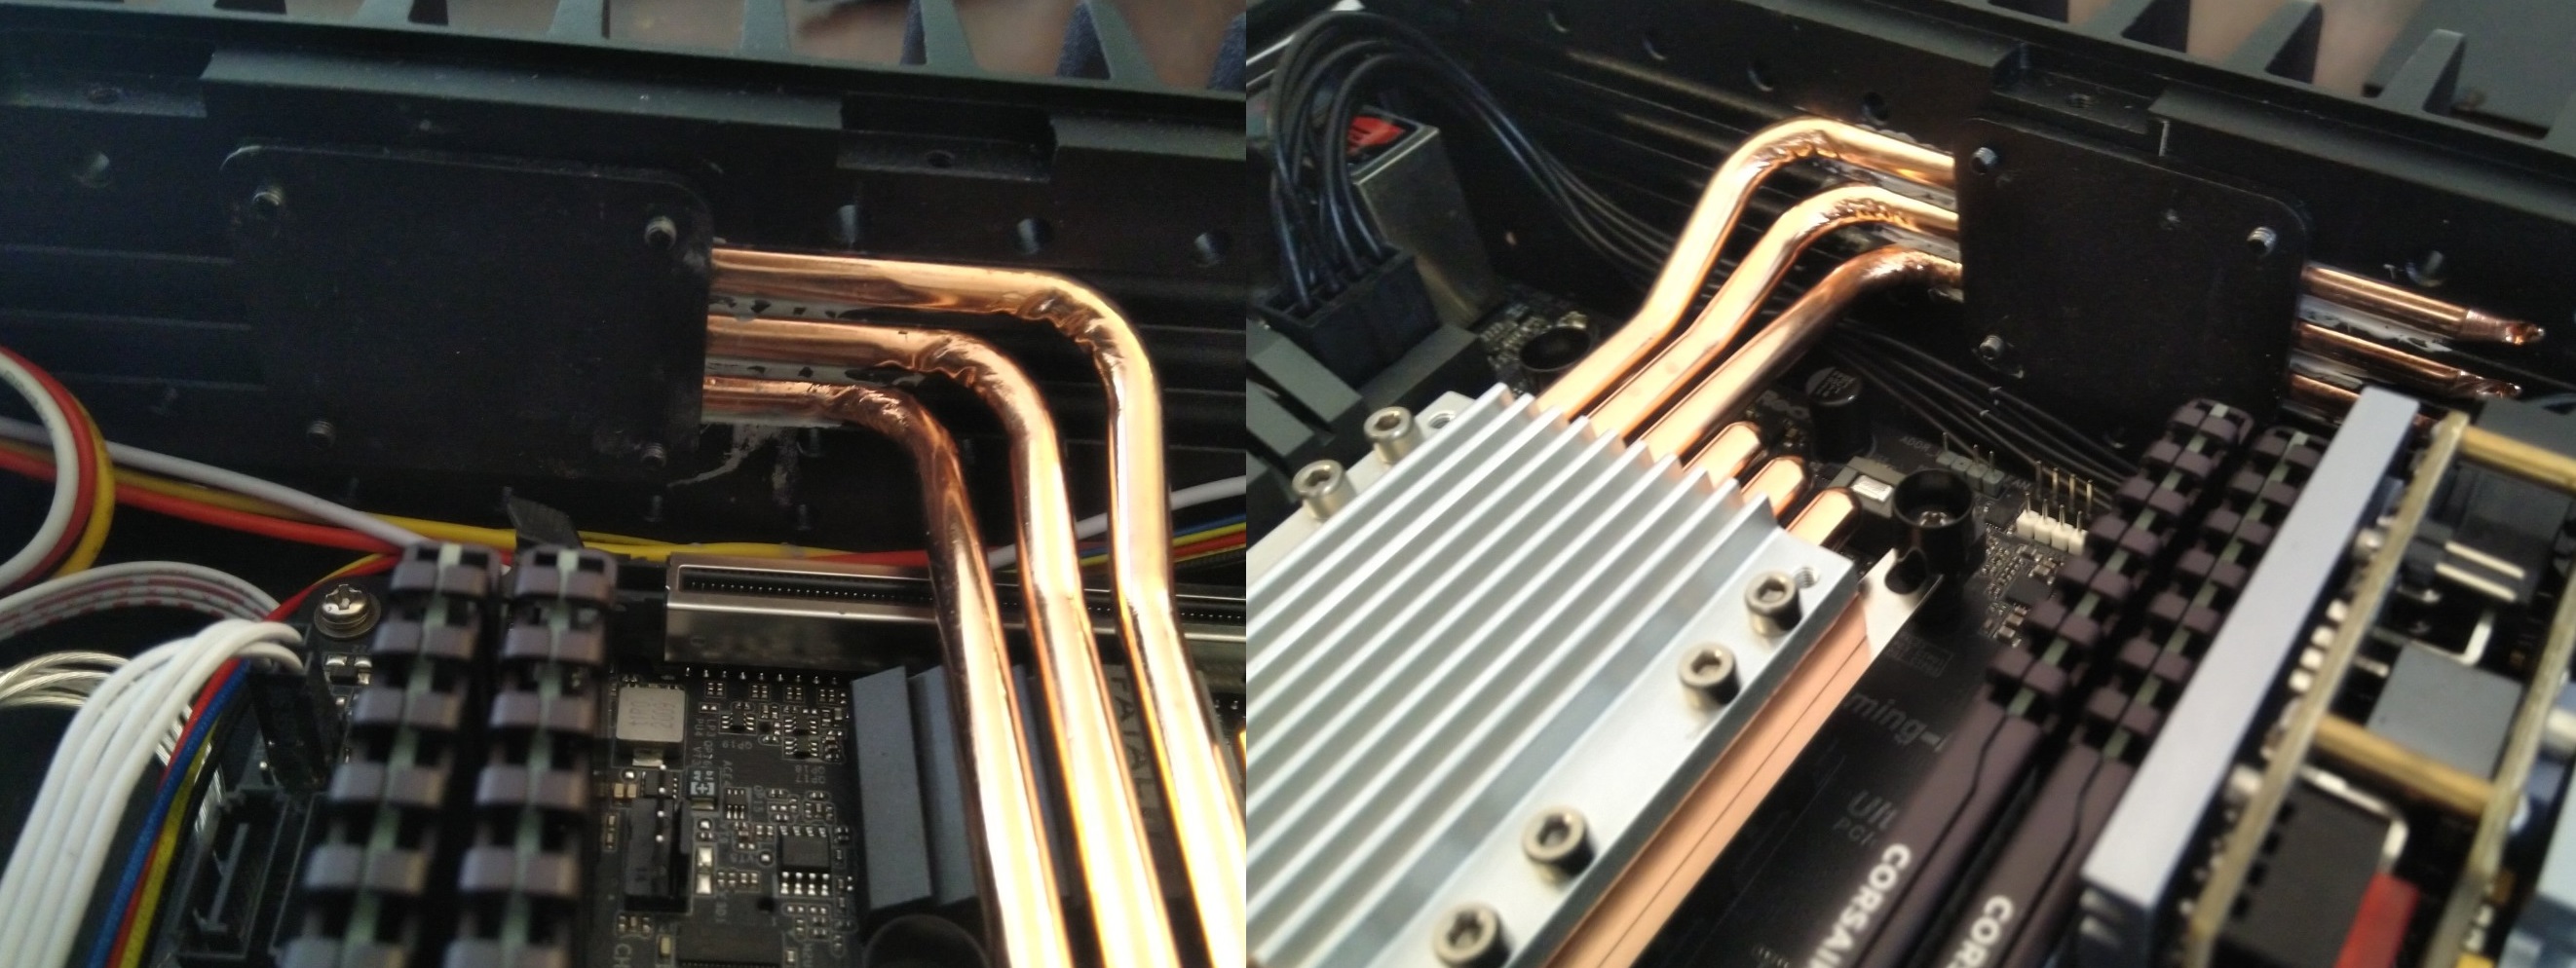
We start the process of installing the cooling system by mounting the CPU cooler heat plate. This is a solid piece of copper with six channels in it for the heat pipes.
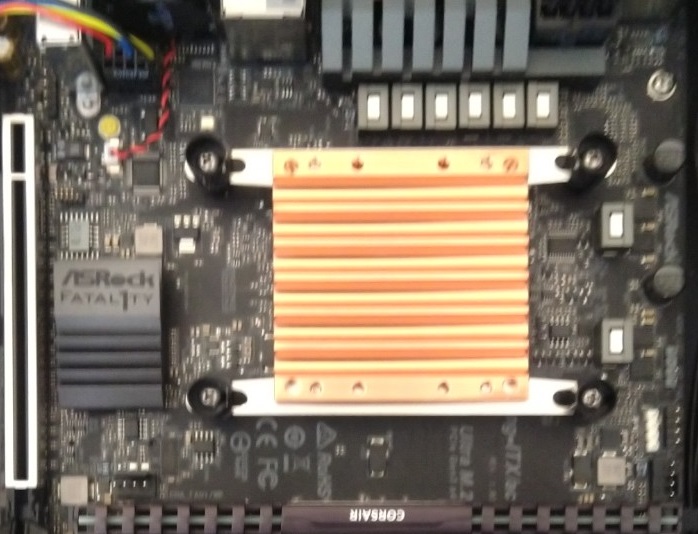
The next few steps involve substantial amounts of thermal paste. Luckily, HDPlex provides a sizeable tube of it, as well as a spherical spreading tool to ensure good coverage. I spread an even layer of paste in the channels of the bottom heat plate and the side panels, restricting coverage in the latter to areas where the heat pipes would be tightly clamped to the side panels. The manual warns against excess thermal paste application, but I think if you do the tightening properly that the force is significant enough that it will squeeze any excess thermal paste out well enough. This will, however, make a mess of the case, so have a bottle of acetone and isopropanol handy. Heck, maybe grab a box of kimwipes!
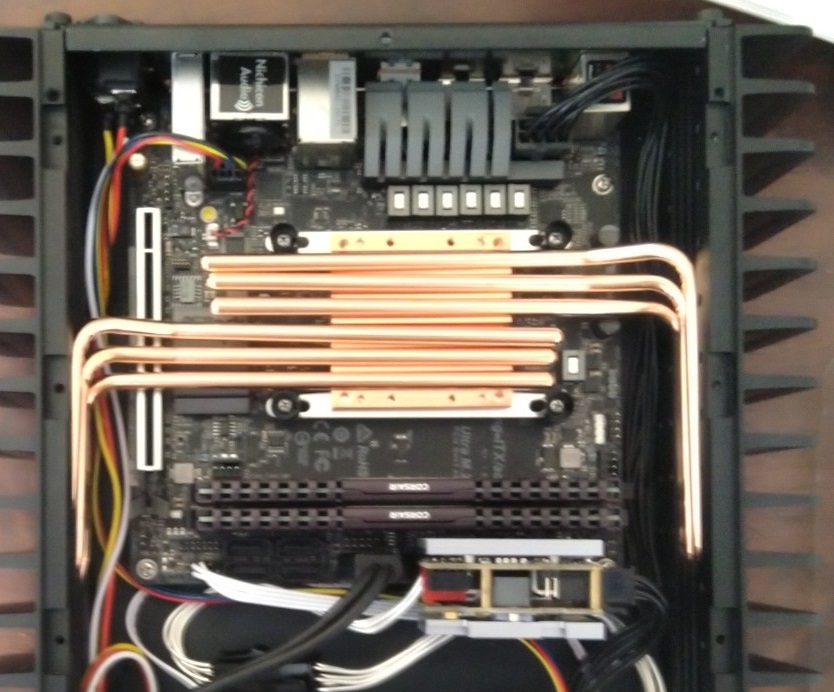
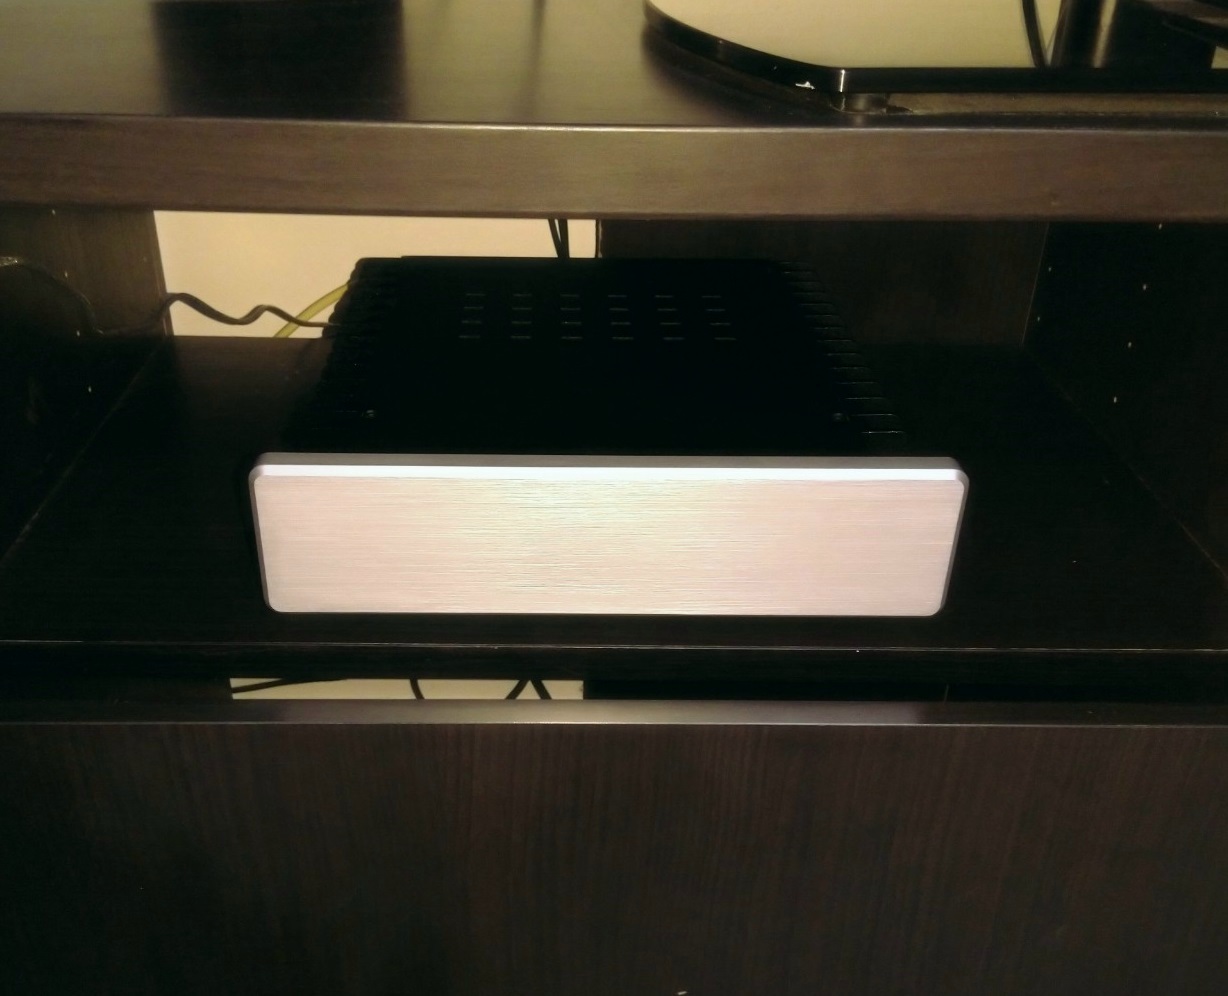
Once the heat pipes and assorted plates are fully tightened, I tightened the main case bolts and installed the SSD holder plate. Again, there’s not a lot of space, and the cables and drive placement requires some finagling. After installing the top cover, I threw it into my television cabinet, in the designated shelf for consoles or video cassette players, things of that nature. The ventilation in this shelving unit is quite poor, but seeing whether this type of system is a suitable hassle-free drop-in replacement for actively cooled HTPCs is part of the challenge. Spending time optimizing the airflow or adding eternal fans would be quite beside the point.
I want to end this section by marvelling at how easy it was to simply drop in my pre-configured Arch linux system and reconfigure it from Intel/Nvidia to this AMD system. With a straight SSD swap, the system does not boot correctly. There are systemd services, etc, trying to start on old peripheral IDs (the new network/video adapters have different names), and the CPU/GPU drivers/firmware are different. However, it was easy enough to reconfigure on the fly without using a boot drive:
- Start the system, get into grub, press “e” to edit and add “single” to the line that starts with
linux \boot\vmlinuz-linux. This boots into recovery mode. Follow the prompts and login as root. - You’ll need the new packages, start a dhcpcd service on your new ethernet adapter, and check the names/connection status with
ip addr. - Disable the old dhcpcd service for the old (now nonexistent) adapter. Enable a service for the new one.
- Purge NVIDIA drivers and install the following amdgpu packages:
mesa, xf86-video-amdgpu. Delete the old X config file. - Remove
intel-ucode, installamd-ucode. - Reconfigure grub (to load the new ucode).
- Reboot normally
After this the system started up and ran as normal with no changes to startup shell or i3 configuration files.
3 Thermal Benchmarking
The near-100% use case of this system is going to be media streaming, either from the internet or LAN, including movies up to 4K resolution. I anticipated that this system would handle that with absolutely no problems, but was curious as to the exact temperatures it would reach under assorted loads, as well as the behavior in extreme conditions where the case absolutely can not remove heat fast enough.
For system data collection under various loads I used lm_sensors. This reads all available information from chipset/cpu/gpu hardware sensors including assorted temperatures, voltages, and currents, if available. The R5-3400G reports core voltage and current, as well as “Tctl” and “Tdie”. In this case, “Tdie” is the die temperature, and “Tctl” is supposed to be the same thing but with a calibrated offset for a more realistic number. Here that calibration offset seems to be zero as they are always the same number, so I only report “Tdie” in my data (I call it  Tj, the junction temperature). I created a simple script to dump each row of the output to file. This could probably be more sophisticated but I kept the bash simple and left the extraction to post-processing in python, which I often do as bash is pretty awkward compared to python (I don’t think that’s a controversial statement).
#!/bin/bash

while :
do
  time="$(date +%s%3N)"
  tctl="$(sensors | grep Tctl)"
  tdie="$(sensors | grep Tdie)"
  vcore="$(sensors | grep Vcore)"
  icore="$(sensors | grep Icore)"
  dataline="${time},${tctl},${tdie},${vcore},${icore}"
  echo "${dataline}"
  echo "${dataline}" >> temps.log
  sleep 0.5
done
To benchmark the thermal/power situation of this system, I took data for the following loads, and also noted the power draw at the wall:
- Idle: 12-15 W, 45 C. There is no separate plot for idling as you can see what it looks like in every plot outside of the specified test window.
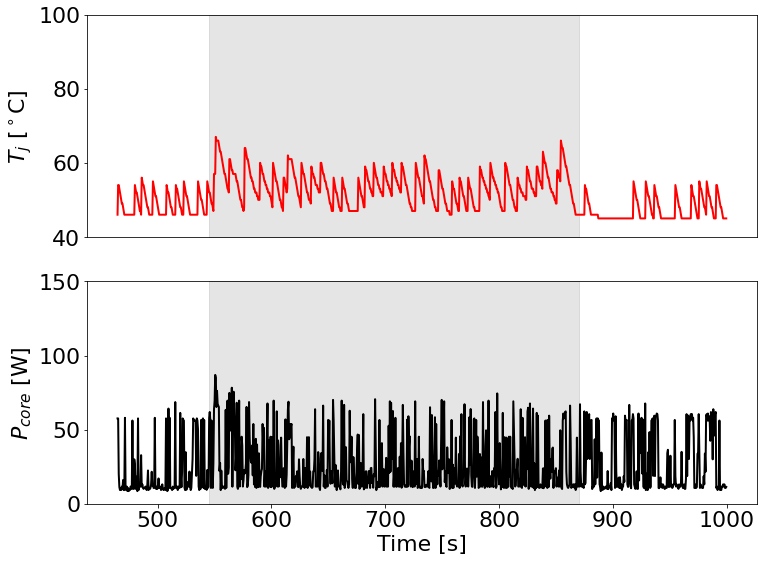
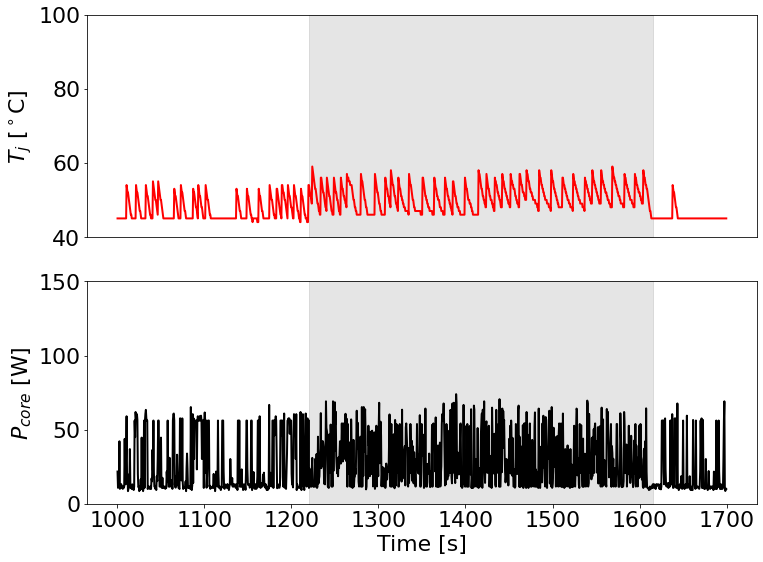
- Youtube streaming at 1080p: 32 W, 55-60 C.
- NAS streaming 4K over LAN: 33-36 W playback, up to 45 W holding the fast-forward button down (lol), 55-60C.
- mprime small FFT: 120 W, 95 C.
Each plot below shows each of these loads over time, with the active time being under the grey shaded area. The Youtube and NAS loads are small and easily manageable by the case. They vary slightly with activity but the case temp does not exceed 60 C at any time.
The mprime load is a different story. Mprime is the linux command line version of Prime95, a program that performs calculations to search for prime numbers using the Lucas-Lehmer method. One part of the method uses fast Fourier transforms to square some factoring numbers (multiplication theorem + some convenient basis for the numbers themselves, it runs in O(n log n) and so scales well for large numbers). You can run it in different configurations that specify how big these factoring numbers are, and therefore influence the CPU/memory resources that are being used. I chose small FFT sizes for this because it limits the memory transfers and runs cooler and I wanted to see if there was thermal throttling with just that test. Upon starting the iterations, the system shot up to the 95 C limit in about 3 minutes.
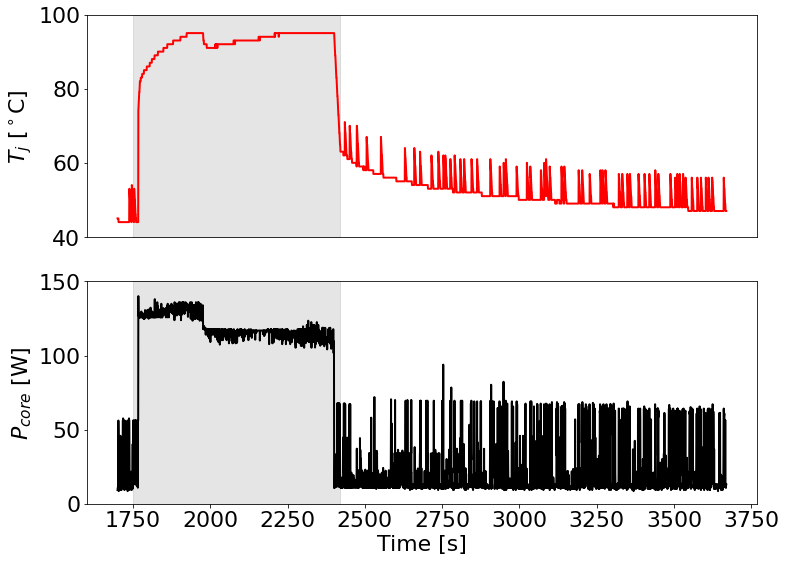
At the maximum temperature, the front brushed aluminum plate was not significantly warm, but the side plates that interface directly with the heat pipes were not possible to comfortably touch. The main limitation of this fanless, “the-case-is-the-heat-sink” kind of system is shown in the cooling curve after the calculations stop. The system takes almost 30 minutes to come back down to the steady-state idle temperature. Again, mprime is not a realistic day-to-day load for this system at all, but it’s interesting to note that it can’t really come back from thermal throttling conditions in a short timescale.
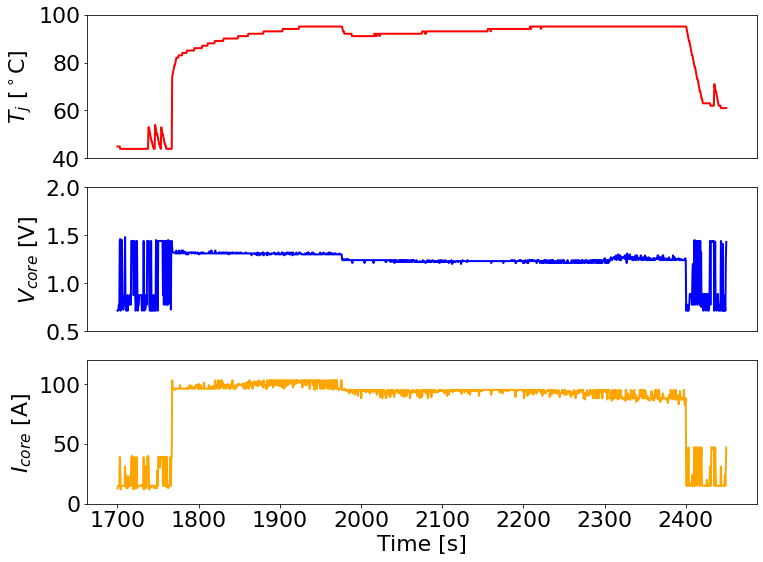
Looking at the core voltage and current during the calculation window, there’s no obvious sign of significant thermal throttling. There is probably some slight, intermittent downclocking that is serving to keep temperatures below 95 C, but it’s not perceptible in this data.
4 Conclusion
Fanless PCs are not new, but due to the extreme power efficiency of modern process nodes, it is becoming possible to run computers that are adequate for many workloads by strapping them to a modest, cereal-box-sized block of aluminum and not using any fans. Personally, I appreciate the total lack of fan noise. This was quite perceptible in my prior HTPC, and sometimes very annoying during quiet movie scenes. What we have here is a fairly powerful system that draws 15-30 W at the wall for common HTPC workloads, and remains at temperatures below 60 C with only conductive and convective cooling. It can even handle intermittent spurts of high compute workloads, though extended operation at full blast for more than ~10-20 minutes will thermally saturate the system and result in throttling.
Regarding cost, this is certainly more expensive than Apple TV/Amazon Fire TV units (in the sub $200 range, usually). However, it is also substantially more snippy, verstatile, and capable overall. Furthermore, this system is lower in cost than typical prebuilt small form factor PCs such as the Intel NUC series, more technologically incredible, and has comparable or higher performance. Additionally, it makes zero noise (except for a slight coil whine if you hold your ear to within 1 ft of the AC-DC unit and plug your other ear so that you can really hear it (just don’t do that, it’s easy enough)). I am looking forward to staring at my beautiful brushed aluminum faceplate for the next few years of home media center use!